
How To Change Jeep Renegade Cabin Air Filter: Behind Glovebox
 Reading Time: 11 minutes
On most U.S.-market Jeep Renegade models, the cabin air filter sits behind the glovebox. You can usually replace it at home in about 15 to 30 minutes with no special tools. The job involves lowering the glovebox, removing the filter access cover, sliding out the old filter, and installing the new one in the same airflow direction.
This guide applies mainly to Jeep Renegade models sold in the United States from 2015 through 2023. Filter access and glovebox trim can vary by model year, trim, and market, so check the owner’s manual or the replacement filter instructions before forcing any panel.

What You Need Before Starting
Prepare the correct cabin air filter for your Jeep Renegade before removing the old one. Filter shapes can vary, and a filter that fits another Jeep, Fiat, or Chrysler model may not fit your Renegade correctly.
You will usually need:
- A replacement cabin air filter listed for your Renegade’s model year and engine
- A clean, dry work area
- A small flashlight
- A trim tool or small flat screwdriver, if needed
- A clean cloth or vacuum cleaner
Most Renegade cabin air filter replacements do not require a socket set. A plastic trim tool is safer than a metal screwdriver because it is less likely to mark the glovebox or dashboard.
Check the filter direction
Look for one of these markings on the new filter:
- Air Flow
- Airflow
- An arrow
- A side marked TOP
The arrow normally points in the direction that air moves through the filter. If the old filter is still installed correctly, photograph it before removal. This gives you a reliable reference if the new filter has unclear markings.
Do not rely only on the pleat shape. Some filters can look correct when installed backward.
Step-by-Step: Replace the Jeep Renegade Cabin Air Filter
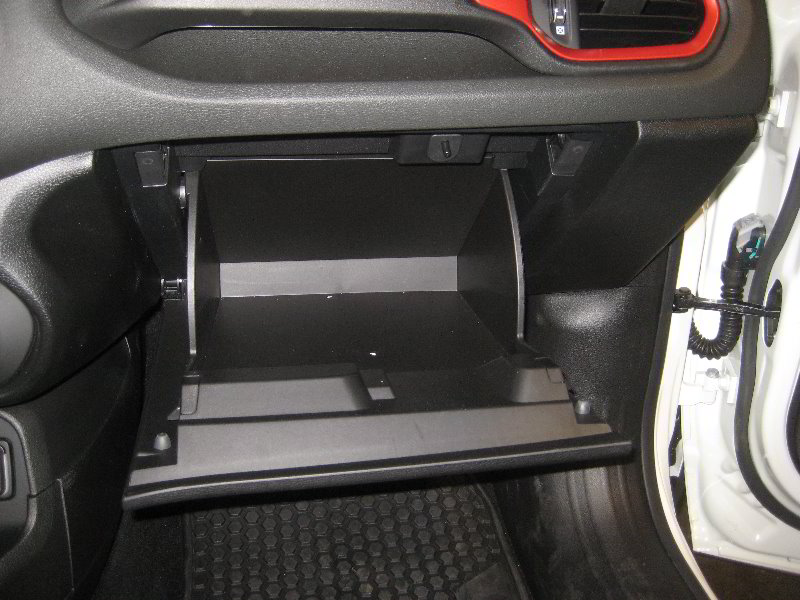
The cabin filter is behind the glovebox, but you usually do not need to remove the entire glovebox from the dashboard. You only need to lower it far enough to reach the filter housing.
1. Park the Renegade safely
Park on a level surface, switch off the ignition, and remove the key or keep the key fob away from the vehicle. Set the parking brake.
Turn off the heater, air conditioner, and blower fan. This prevents dust and loose debris from being pulled through the HVAC system while you work.
Open the passenger door if you need more room. Keep the glovebox contents nearby but out of the way.
2. Empty the glovebox
Remove all items from the glovebox. Pens, papers, and small objects can fall into the footwell when the glovebox is lowered.
Use this time to inspect the glovebox for a damper strap or cord. Many Renegade versions have a small damper connected to the right side of the glovebox. The damper slows the glovebox as it opens.
3. Disconnect the glovebox damper
If your Renegade has a damper cord or small retaining clip on the right side, disconnect it carefully.
Depending on the vehicle version, the damper may:
- Slide off a small peg
- Release from a clip
- Require gentle movement of the glovebox to create slack
Do not pull hard on the cord. The plastic mounting point can break if the cord is forced while under tension.
If your Renegade does not have a damper, move to the next step.
4. Lower the glovebox
Open the glovebox fully. Press the left and right sides of the glovebox inward to release the stop tabs from the dashboard opening.
The exact amount of pressure needed varies. Squeeze one side at a time if that is easier. Once the stops clear the dashboard, let the glovebox swing downward.
Support the glovebox rather than allowing it to hang by its hinges or wiring. If it does not lower with light pressure, stop and look for a hidden side stop or damper connection.
5. Find the cabin filter access cover
With the glovebox lowered, look toward the rear of the compartment. You should see a narrow plastic filter cover on the HVAC housing.
The cover normally has small locking tabs. The filter cover may be vertical or slightly angled, depending on the model year and HVAC housing design.
Use a flashlight to identify the tabs before pressing them. Do not pry against nearby wiring, ducts, or the thin plastic HVAC case.
6. Remove the filter cover
Release the cover tabs and pull the access cover away from the housing.
If the cover feels stuck:
- Check that both tabs are released.
- Press the cover inward slightly before pulling it out.
- Use a plastic trim tool only at the molded edge.
- Avoid twisting the cover sharply.
Set the cover aside in a clean place. If you break a retaining tab, the cover may not stay secure and could create a rattle or allow unfiltered air to bypass the filter.
7. Remove the old cabin air filter
Pull the old filter straight out of the housing. Move slowly because leaves, dust, and dirt may be resting on the filter.
Notice how the old filter is installed. Look at:
- The direction of any airflow arrow
- The top and bottom markings
- The position of the pleats
- The side with more visible dirt
A dirty side facing the incoming air usually indicates the filter’s inlet side. Take a photo if you are unsure.
Do not shake the old filter inside the cabin. That can spread dust and pollen onto the dashboard and seats.
8. Clean the filter housing
Use a dry cloth or a vacuum to remove loose debris from the filter slot. A vacuum with a narrow nozzle works well.
Do not spray cleaner, water, or compressed air deep into the HVAC housing. Moisture can remain inside the duct, and strong air pressure can move debris farther into the blower or evaporator area.
If you see standing water, heavy mold-like growth, or a damaged housing, stop and investigate the cause. A cabin filter replacement will not correct a leaking HVAC case or blocked drain.
9. Install the new filter
Slide the new filter into the housing in the same direction as the old one. Follow the airflow arrow or the filter’s TOP marking.
The filter should slide in without major force. If it binds:
- Remove it and check the orientation.
- Confirm that the filter is the correct part.
- Check for a bent edge or crushed pleat.
- Look for debris inside the housing.
Do not fold, crush, or force the filter into place. A distorted filter can leave gaps around its edges and allow dust to bypass the filter.
10. Reinstall the filter cover
Position the cover over the filter housing and press it into place until the retaining tabs lock.
Check that the cover sits flush. A loose cover can cause air leaks, vibration, or a whistling noise when the blower runs.
11. Raise and reconnect the glovebox
Lift the glovebox back toward the dashboard. Reconnect the damper if your vehicle has one.
Press the glovebox sides inward again so the stop tabs can pass through the opening. Then release the sides and make sure the stops rest in their normal position.
Open and close the glovebox several times. It should move smoothly and stay aligned with the dashboard.
12. Test the HVAC system
Start the Renegade and run the blower at low, medium, and high speed. Test both outside-air and recirculation modes.
Listen for:
- Rattling
- Whistling
- Scraping
- A loose plastic cover
- A blower that struggles to move air
A short puff of dust may occur after replacement. Persistent noise or weak airflow usually means the filter is misaligned, the cover is loose, or debris has moved into the blower area.
How to Confirm the Filter Is Installed Correctly
A correctly installed cabin air filter should sit flat in its slot, with no crushed corners or large gaps around the frame. The access cover should lock fully, and the glovebox should close without rubbing.
Use this quick check:
| Check | Correct result |
|---|---|
| Filter orientation | Airflow arrow follows the old filter or the housing direction |
| Filter fit | Filter slides in without bending or force |
| Filter cover | Cover sits flush and locks in place |
| Glovebox | Opens and closes normally |
| HVAC blower | Runs without new rattles or whistles |
| Airflow | Air comes from the selected vents with normal strength |
A new filter may not immediately remove an odor from the cabin. Odors can remain in the evaporator, floor carpet, seats, or air ducts. The filter mainly catches airborne particles; it is not a complete odor treatment.
If the air still smells musty, run the blower with the air conditioner off for a short period before parking. Also check for wet carpets or water intrusion. Persistent dampness needs separate diagnosis.
Common Problems and How to Fix Them
The glovebox will not drop
The most common causes are a connected damper, a stop tab that has not cleared, or pressure from items inside the compartment.
Empty the glovebox and inspect both sides. Disconnect the damper if fitted, then press both side walls inward while lowering the box. Do not pull the glovebox down with force.
The filter cover will not come off
Check for a second locking tab. Some tabs are difficult to see from the passenger seat.
Use a flashlight and release the tabs one at a time. If the cover still does not move, confirm that you are working on the filter cover rather than a fixed part of the HVAC housing.
The new filter does not fit
Verify the part number by vehicle year and trim. A filter may be listed for a Fiat 500X or another Chrysler product but still have a different frame or thickness.
Compare the old and new filters before installation:
- Overall length
- Overall width
- Thickness
- Frame shape
- Tab or handle location
Do not trim the filter to make it fit. A shortened or crushed filter may allow unfiltered air into the cabin.
Airflow is weaker after replacement
A filter installed backward usually does not stop airflow completely, but a filter that is too thick or folded can restrict it.
Remove the filter and check its position. Also inspect the blower inlet for leaves or other debris. If airflow was weak before the replacement, the problem may involve the blower motor, resistor, ductwork, or evaporator rather than the filter.
There is a new rattle
A loose filter cover, glovebox damper, or misplaced item can create a rattle. Run the blower at different speeds and listen near the passenger footwell.
Recheck the cover and glovebox. If the sound changes with fan speed and continues after the cover is secure, debris may have entered the blower assembly.

When Should You Replace the Cabin Air Filter?
Replace the cabin air filter at the interval listed in your Renegade owner’s manual. The correct interval can vary with model year, driving conditions, and the filter type.
Consider checking it sooner if you drive regularly in:
- Dusty rural areas
- Construction zones
- Heavy traffic
- Areas with wildfire smoke
- Regions with high pollen
- Unpaved roads
- Places with frequent leaf or plant debris
A filter may need replacement before the scheduled service if you notice reduced airflow, more dust inside the cabin, or a musty smell from the vents.
Do not judge the filter only by its color. Some filters turn gray quickly but still have usable airflow, while a filter can be restricted by fine dust without looking extremely dirty. A clogged pleat surface and reduced airflow are more useful signs.
Standard, Charcoal, and HEPA-Style Filters
A standard particulate filter is designed to catch dust, pollen, and larger airborne particles. A charcoal or activated-carbon filter adds a layer that can help reduce some outside odors and certain gases.
A HEPA-style filter may capture very small particles, but its thicker media can restrict airflow if it is not designed for the Renegade’s HVAC system. Use only a filter that matches the vehicle’s approved size and fit.
Choose based on your driving needs:
| Filter type | Useful for | Main trade-off |
|---|---|---|
| Standard particulate | Dust and pollen | Less odor control |
| Activated carbon | Dust plus some outside odors | May cost more |
| HEPA-style | Fine particle filtration | Must have correct fit and airflow |
| Washable or reusable | Repeated use in some designs | Requires proper cleaning and drying |
A more expensive filter is not automatically better for every Renegade. Correct fit, airflow, and regular replacement matter more than marketing terms.
Safety and Fitment Limits
This procedure is a low-risk maintenance task, but avoid working around the HVAC system with the blower running. Keep fingers, tools, and loose clothing away from the fan area.
Do not disconnect electrical connectors unless the repair procedure requires it. The cabin filter can normally be changed without removing the glovebox wiring or dashboard panels.
For a Renegade with unusual trim, a damaged glovebox, water inside the filter housing, or signs of mold, use the model-specific service information or ask a qualified technician for help. The owner’s manual is the final reference for your vehicle’s service schedule and market-specific equipment.
Frequently Asked Questions
Does every Jeep Renegade have the cabin air filter behind the glovebox?
Most U.S.-market Jeep Renegade models place the cabin air filter behind the glovebox. Access details can differ by model year and trim, so confirm the location before removing panels.
Do I need to remove the whole glovebox?
Usually, no. The glovebox generally lowers after you disconnect its damper and release the side stops. Full removal is not normally needed for a routine filter change.
Which way does the cabin air filter arrow point?
Install the filter according to the arrow marked Air Flow. If the old filter was installed correctly, match its direction. Do not guess from the pleat pattern alone.
Can I run the Jeep Renegade without the cabin air filter?
Avoid running the HVAC system without the filter installed. The filter helps keep dust and debris out of the blower and air ducts. If you remove it briefly for inspection, reinstall it before normal driving.
Why does my Jeep still smell after I replace the filter?
The odor may come from moisture, the evaporator, carpet, seats, or debris in the HVAC system. Check for wet flooring and confirm that the new filter is dry and correctly installed. A filter alone may not remove an established odor.
Can I clean and reuse the old filter?
Most paper and pleated cabin filters are disposable. Do not wash them unless the manufacturer specifically identifies the filter as washable. Washing a disposable filter can damage its media and reduce filtration.
Final Check
Changing the cabin air filter on a Jeep Renegade is usually a simple behind-the-glovebox service. Lower the glovebox carefully, release the filter cover, copy the old filter’s direction, and install the replacement without forcing it.
Afterward, confirm that the cover is secure, the glovebox is aligned, and the blower runs without new noise. If the filter will not fit or the airflow remains poor, stop and verify the filter part number and housing before driving further.