

How To Replace Liftgate Struts: Jeep Cherokee Guide
 Reading Time: 13 minutes
Replacing liftgate struts on a Jeep Grand Cherokee or Jeep Cherokee is usually a simple repair. Most owners can finish it in about 20 to 40 minutes with replacement lift supports, a small flat screwdriver, and a helper.
The key safety rule is simple: support the liftgate before removing even one strut. A weak or unsupported liftgate can drop without warning and cause injury or body damage.
This guide applies to many Jeep Grand Cherokee and Cherokee models sold in the United States. Strut design, mounting clips, and power-liftgate equipment can vary by year and trim. Always match the replacement part to your Jeep’s exact year, model, body style, and liftgate equipment.
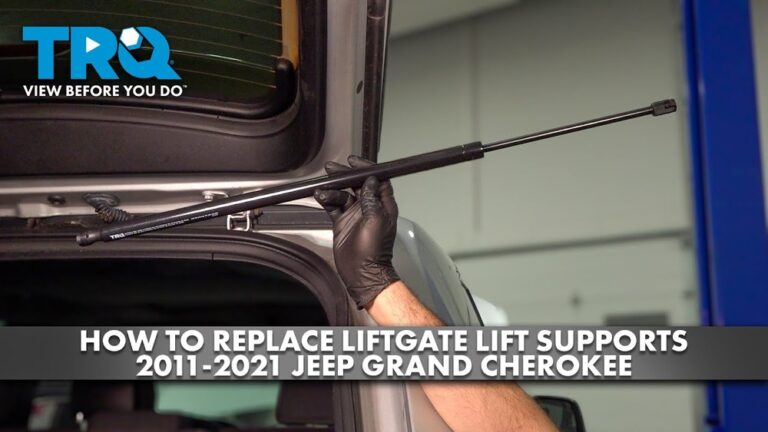
What Liftgate Struts Do
Liftgate struts are gas-filled supports that hold the rear hatch open. They are also called lift supports, gas springs, hatch struts, or tailgate struts.
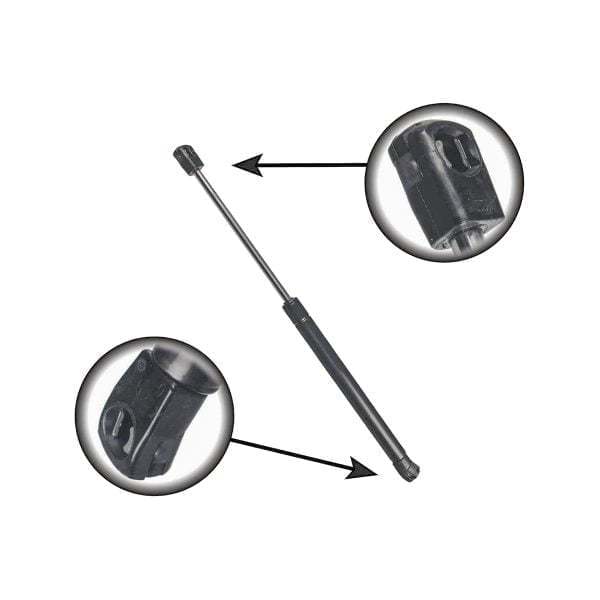
Each strut has a cylinder and a piston rod. Pressurized gas inside the cylinder helps carry the weight of the liftgate. Over time, the seals can wear out and the gas pressure can fall.
A failing liftgate strut may cause:
- The liftgate to fall or close by itself
- A hatch that will not stay open in cold weather
- Slow or uneven opening
- A popping or clunking sound near the hinges
- Oil or residue around the strut
- Extra effort when opening the liftgate by hand
- A power liftgate that reverses or struggles
A strut does not usually need adjustment. When it loses pressure, replacement is normally the correct repair.
Grand Cherokee and Cherokee naming
The Jeep Cherokee is a different vehicle from the Jeep Grand Cherokee. Their liftgate struts are not interchangeable unless a parts catalog specifically confirms compatibility.
Common U.S. model groups include:
| Jeep model | Common U.S. generations | Fitment caution |
|---|---|---|
| Jeep Cherokee | XJ, KL | Body design and strut length vary greatly |
| Jeep Grand Cherokee | ZJ, WJ, WK, WK2, WL | Power-liftgate parts may differ from manual-liftgate parts |
A part listed for a “Jeep Cherokee” may not fit a “Grand Cherokee.” Confirm the vehicle identification number, model year, trim, and whether the liftgate is manual or power-operated.
Tools and Parts You Need
Prepare the correct parts and support equipment before opening the liftgate.
Basic tools
Most Jeep liftgate strut replacements need:
- Replacement liftgate struts
- Small flat-blade screwdriver or pick tool
- A second person to hold the liftgate
- A strong support pole or padded prop
- Safety glasses
- Work gloves
- Clean cloth
Some versions may use bolts instead of ball-and-socket clips. Those may require:
- Ratchet
- Socket set
- Torx bit or wrench
- Open-end wrench
Check the new strut and the old mounting hardware before starting. The new part should have the same overall length, mounting ends, clip style, and approximate cylinder diameter.
Replace one or both?
Replace both liftgate struts when:
- Both are the same age
- One has clearly failed and the other feels weak
- The liftgate is heavy or uneven
- The vehicle is used in a cold climate
- You want balanced support
Replacing only one strut can work if the other is known to be new and correctly matched. In most cases, a pair gives more even support.
Do not replace a strut with a part that has a higher force rating simply because it appears stronger. Excessive force can make the liftgate hard to close or place extra stress on hinges and mounting points.

How to Replace Liftgate Struts on a Jeep Grand Cherokee or Cherokee
The general method is the same for most manual liftgates and many gas-assisted power liftgates. Work slowly and keep the hatch supported throughout the repair.
1. Park on level ground
Park the Jeep on a flat surface. Place the transmission in Park and apply the parking brake.
Turn off the ignition. Keep the key fob away from the vehicle if it has a power liftgate. This reduces the chance of accidental liftgate movement.
Do not perform the repair on a slope. A sloped vehicle can change the load on the liftgate and make the hatch harder to control.
2. Open the liftgate fully
Raise the liftgate to its normal full-open position. If the hatch will not stay open, have another adult hold it from the center.
Do not rely on a failing strut to hold the hatch. Place a padded support under a strong part of the liftgate, such as the center reinforcement area. Do not push the support against fragile trim, the rear glass, wiring, or the wiper motor.
A helper should remain near the liftgate while you remove and install the strut.
3. Inspect the replacement strut
Compare the new part with the old one before removing anything.
Check:
- Overall extended length
- Retracted length, if listed
- Left- or right-side designation
- Ball-socket or bolt attachment
- Retaining clip design
- Connector or wiring, if present
- Manufacturer part number
- Force rating
Some struts have a thin retaining clip around the socket. Others use a wire clip that remains partly attached to the socket.
Never remove the retaining clip completely unless the part instructions require it. On many designs, the clip only needs to be lifted slightly so the socket can slide off the ball.
4. Release the upper retaining clip
Start with one end of the strut. Use a small flat screwdriver to lift the retaining clip slightly.
Do not force the screwdriver deep into the socket. You only need enough clearance to release the socket from the ball stud.
Keep one hand on the strut so it does not swing when it releases. If the clip does not move, stop and inspect its design. A damaged clip or wrong tool can break the socket.
5. Remove the upper end from the ball stud
With the clip lifted, pull the strut straight away from the ball stud.
You may need a small rocking motion. Do not twist the liftgate or pry against painted body panels.
If the socket is tight, ask the helper to move the liftgate a few millimeters up or down. This can reduce pressure on the ball joint.
6. Release the lower retaining clip
Support the strut and liftgate as you release the lower clip. Use the same method as the upper end.
Once the lower socket comes free, remove the old strut. Keep track of its orientation before discarding it.
If the strut uses bolts, remove the bolts while the helper supports the liftgate. Do not remove a bolt while the hatch is unsupported.
7. Confirm the installation direction
Many gas struts should be installed with the cylinder body higher and the piston rod lower when the liftgate is closed. This position helps keep the internal seal lubricated on many conventional gas springs.
However, the correct direction depends on the part design. Follow the replacement manufacturer’s instructions if they specify an orientation.
A strut with an electrical connector, sensor, or special damping feature may have a required position. Do not assume that every strut installs the same way.
8. Attach the new strut
Press the new socket onto the lower ball stud until it clicks into place. You may need to lift the retaining clip slightly before pressing the socket on.
Then align the upper socket with the upper ball stud. Have the helper adjust the liftgate height slightly if needed. Press the socket onto the ball until it is fully seated.
You should not need a hammer. Do not strike the cylinder or piston rod.
9. Check the retaining clips
Inspect both ends of the new strut.
The clips should sit in their locked position. The socket should fully cover the ball stud. Pull gently on the strut to confirm that it does not come off.
If a clip will not lock, remove the strut and inspect the socket and ball. A mismatched part may appear to fit but may not lock safely.
10. Replace the second strut
If replacing both sides, keep the liftgate supported while changing the second strut.
Do not remove both struts at the same time. Without either strut attached, the liftgate can become unstable and much heavier to control.
Install the second strut in the same orientation as the first, unless the part instructions state otherwise.
11. Test the liftgate by hand
Before testing a power liftgate, close and open the hatch slowly by hand.
Look and listen for:
- Smooth movement
- Binding
- Popping
- Scraping
- Uneven movement
- Contact with body panels
- Struts twisting or rubbing
The liftgate may feel different after installation. New struts can make the hatch open more firmly than the old, worn parts.
12. Test the power function, if equipped
If the Jeep has a power liftgate, stand clear of the hatch and test it with the interior button, exterior button, or key fob.
Watch the full cycle. Stop the liftgate immediately if it:
- Reverses unexpectedly
- Stops before reaching the latch
- Moves unevenly
- Makes a grinding or clicking sound
- Pushes hard against the latch
- Shows a warning message
Some power liftgate systems use electric actuators or position sensors in addition to gas support. Replacing a gas strut will not repair a failed motor, wiring fault, control module, or position sensor.

How to Tell Whether the Strut Is the Real Problem
A liftgate that falls is often caused by worn struts, but not every hatch problem comes from the struts.
| Symptom | Likely cause | First check |
|---|---|---|
| Hatch falls after opening | Weak lift supports | Inspect both struts and replace as a matched pair |
| Hatch is hard to open | Weak struts, damaged hinge, cold temperature | Check struts, hinges, and temperature conditions |
| One side moves first | Uneven strut force or bent hardware | Compare both struts and mounting points |
| Hatch will not latch | Misaligned latch, damaged striker, obstruction | Inspect latch and striker before changing struts |
| Power hatch beeps or reverses | Motor, sensor, obstruction, or weak support | Check for stored fault messages and mechanical binding |
| Popping near hinge | Loose fastener, damaged ball stud, hinge issue | Inspect mounting hardware |
| Strut leaks oil | Failed seal or damaged cylinder | Replace the strut |
| New strut does not fit | Wrong part or incorrect side | Recheck year, trim, body style, and part number |
Cold-weather behavior
Gas struts often feel weaker in low temperatures. This does not always mean they have failed, but a hatch that only stays open in warm weather is a strong sign that the struts are near the end of their service life.
Do not heat a strut with a torch, heat gun, or other direct heat source. The cylinder is pressurized.
Power liftgate problems
A power liftgate may have more than one support component. Depending on the Jeep version, the system can include:
- Gas lift supports
- Electric drive units
- Hall-effect or position sensors
- Latches and strikers
- Wiring harnesses
- Control modules
- Anti-pinch protection
If the hatch works normally by hand but the power function fails, the struts may not be the main problem. If it is difficult to move by hand, check for mechanical binding before replacing electronic parts.

Common Mistakes to Avoid
Avoiding a few common errors makes this repair safer and prevents repeat work.
Removing both struts without support
This is the most serious mistake. The liftgate can drop suddenly once the last support is removed.
Use a helper and a secure padded prop. Do not use a loose broom, weak stick, or object that can slip.
Pry against the paint
A screwdriver can chip paint or bend a thin bracket. Lift the retaining clip only as far as needed and pull the socket straight off the ball.
Cover the tool with a thin cloth if the clip is close to painted bodywork.
Installing the wrong part
A Cherokee XJ, Cherokee KL, and Grand Cherokee WK2 can have very different liftgate supports. Even parts that look similar may differ in length, force, and socket design.
Use a verified catalog listing or the original part number. Vehicle year alone may not be enough.
Forgetting the clip
The retaining clip must lock around the ball stud. A socket that only appears to be pressed on can separate during driving or while the hatch is open.
Inspect the clip from all sides before removing the support.
Forcing a tight connection
If the socket does not fit, do not hammer it or enlarge it. Recheck the part number and ball-stud size.
A helper can adjust the hatch height to align the socket. This is safer than forcing the strut into place.
Testing a power liftgate too soon
First confirm that the hatch moves freely by hand. Then test the power function.
If the hatch binds, the electric system may detect resistance and reverse. Repeatedly forcing a faulty system can damage the actuator or latch.

When to Stop and Get Professional Help
The repair is usually suitable for a careful do-it-yourself owner, but professional help is sensible when:
- The liftgate is unusually heavy or large
- The hinges are bent or loose
- The mounting brackets are cracked
- The ball studs pull out of the body
- The hatch is misaligned
- The power liftgate has an electrical fault
- The liftgate glass or wiring is damaged
- You cannot support the hatch securely
- The correct replacement part cannot be confirmed
Do not work beneath an unsupported liftgate. If the hatch has powered equipment or unusual struts, use the service information for the exact vehicle configuration.
Sources to check before ordering
For the most reliable fitment information, compare:
- The Jeep owner’s manual
- The official Mopar parts catalog
- A reputable parts catalog that allows VIN lookup
- The replacement manufacturer’s installation instructions
- A Jeep service manual for the exact generation
Owner manuals can explain power-liftgate operation and safety features. Parts catalogs are more useful for confirming the correct lift support and mounting hardware.

How Much Time Does the Repair Take?
For a conventional liftgate support, the physical replacement often takes about 20 to 40 minutes. This is an estimate, not a factory labor time.
The job may take longer when:
- The clips are corroded
- The liftgate will not stay open
- The ball studs are damaged
- The trim blocks access
- The vehicle has a power liftgate
- The replacement part does not match
- The hatch is misaligned
The most important time-saving step is checking fitment before removing the old part.
How to Confirm the Repair Worked
The replacement is successful when:
- Both sockets are fully locked onto their ball studs.
- The retaining clips sit in the locked position.
- The liftgate stays open without outside support.
- The hatch opens and closes smoothly.
- Neither strut rubs against trim or bodywork.
- The liftgate latches without extra force.
- A power liftgate completes its cycle without reversing or warning.
After a short drive, inspect the mounting points again. Look for loose clips, unusual movement, or new noise.
Frequently Asked Questions
Can I replace only one Jeep liftgate strut?
Yes, but replacing both is usually better when they are the same age. Two matched supports provide more even force and reduce the chance that the liftgate will twist or move unevenly.
Do Jeep Cherokee and Grand Cherokee liftgate struts fit each other?
Usually not. They are different vehicle lines with different liftgate sizes and mounting designs. Confirm compatibility by year, body generation, trim, liftgate type, and part number.
Which way should a liftgate strut be installed?
Many conventional gas struts install with the cylinder higher and piston rod lower when the liftgate is closed. Follow the instructions for the exact replacement part, especially if it has wiring, sensors, or a special design.
Why does my power liftgate still fail after I replace the struts?
The problem may be an electric actuator, latch, sensor, wiring fault, obstruction, or control-system issue. Test the hatch by hand first. If it binds manually, find the mechanical problem before diagnosing the electronics.
Can I drive with a weak liftgate strut?
You can usually drive the Jeep with the liftgate closed, but do not rely on a weak strut to hold the hatch open. A liftgate that falls can cause injury. Replace the supports soon and keep the hatch closed until the repair is complete.
Final Takeaway
Replacing liftgate struts on a Jeep Grand Cherokee or Cherokee is a manageable repair when the correct parts are used and the hatch is supported securely. Remove and replace one strut at a time, verify that each retaining clip locks, and test the liftgate by hand before using a power-opening feature.
The next step is to identify the Jeep’s exact model year, generation, trim, and liftgate type, then confirm the replacement strut by VIN or an authoritative parts catalog.


