

How To Install A Cargo Net And Dog Barrier: Wrangler
 Reading Time: 15 minutes
A cargo net and dog barrier can help keep your Jeep Wrangler’s rear cargo area organized and keep a dog from climbing into the front seats. In the United States, the safest installation depends on your Wrangler generation, the exact accessory, and the anchor points listed in its instructions. Most systems attach to factory cargo hooks, seat-back loops, headrest posts, or approved trim openings.
Do not treat a cargo net or pet barrier as a crash-rated restraint. Secure your dog with a properly fitted harness or place the dog in a secured crate. Keep heavy items low, keep the driver’s view clear, and never block the Jeep’s seat belts, airbags, or emergency exits.

Key Takeaways
- Check whether your Wrangler is a JK, JL, or 4xe before buying or installing an accessory.
- Read the accessory instructions first. Mounting points differ between model years and brands.
- Install the cargo net low and tight enough to stop loose items from moving.
- Install the dog barrier only on its intended upper and lower anchor points.
- Do not attach accessories to airbag trim, seat-belt hardware, wiring, or unapproved roll-bar locations.
- A barrier limits movement inside the cabin. It does not replace a dog harness or secured crate.
- Test the installation before driving and inspect it after the first trip.
Check Compatibility Before You Start
The first step is to confirm that the cargo net and dog barrier fit your exact four-door Jeep Wrangler. A four-door Wrangler may be a JK, JL, or JL 4xe, and the rear interior trim and anchor points can differ.
Look for these details on the product label or instruction sheet:
- Vehicle generation, such as JK or JL
- Model years covered
- Four-door or two-door fitment
- Hardtop, soft-top, or both
- Compatibility with the 4xe hybrid battery layout
- Required factory cargo hooks or loops
- Whether the rear seat may remain upright
- Whether the product fits with a cargo cover, subwoofer, or floor mat
- Maximum load rating, if one is provided
- Whether drilling or permanent changes are required
A product made for a two-door Wrangler may not fit a four-door model. A JL accessory may also fail to line up correctly in a JK, even if both vehicles look similar from the cargo area.
Identify the useful factory attachment points
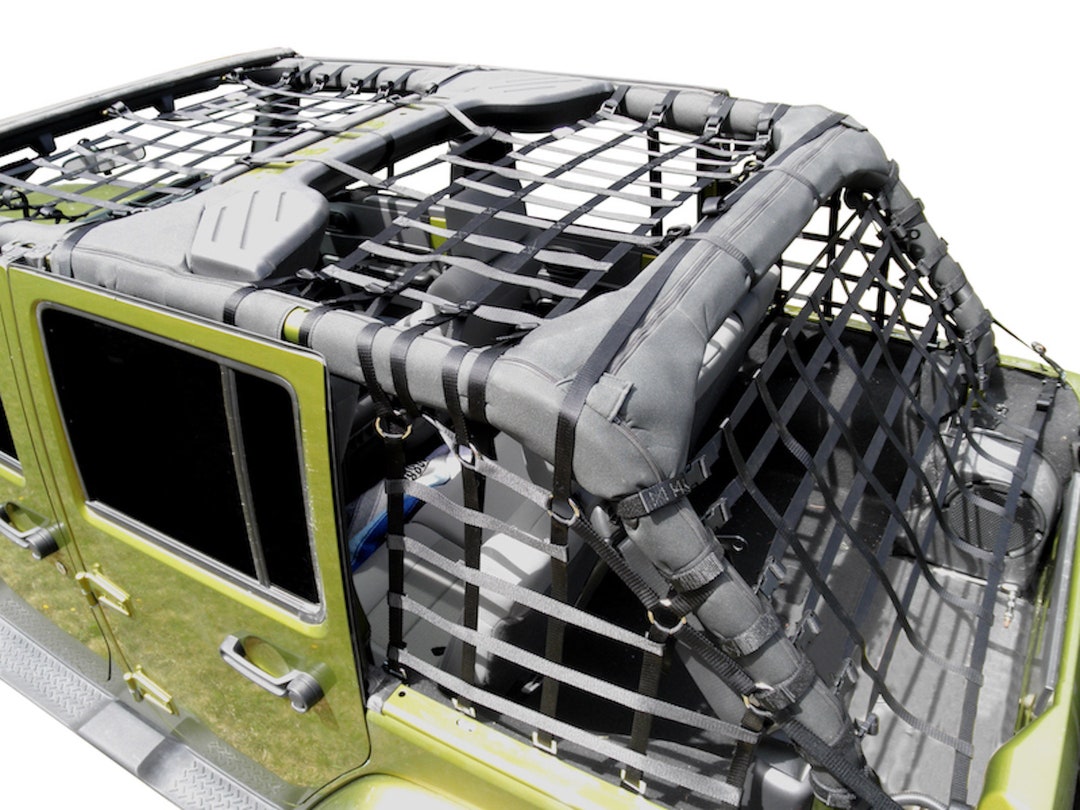
Most four-door Wranglers have several possible attachment areas:
- Rear cargo tie-down loops
- Floor-mounted cargo hooks
- Seat-back retaining loops
- Rear headrest posts
- Side trim openings
- Factory hardtop or cargo-cover mounts
Use only the points named by the accessory manufacturer. Do not assume that a strong-looking bolt, trim screw, or roll-bar tube is safe for a pet barrier. Some parts support interior trim only and are not designed to hold a moving load.
Inspect the cargo area
Before installation, remove loose items from the cargo floor. Check for:
- Damaged or missing tie-down hooks
- Cracked plastic trim
- Frayed straps
- Bent metal brackets
- Exposed wiring
- Sharp edges
- Water, dirt, or debris around the mounting points
If a factory anchor is loose, repair it before using the net or barrier. Do not compensate for a weak anchor by adding extra straps to random locations.

Tools and supplies
most no-drill cargo nets and dog barriers need only simple tools. Gather the following before you begin:
- The cargo net
- The dog barrier
- Printed installation instructions
- A flashlight
- Clean gloves
- A trim-safe plastic tool, if needed
- A small socket set or screwdriver, if the instructions require one
- A tape measure
- Mild soap and water
- A soft cloth
- A dog harness or secured crate for the final safety check
Avoid power tools unless the instructions specifically require them. An electric drill can damage wiring, body panels, or airbag components hidden behind interior trim.
Do not use zip ties as the main load-bearing attachment unless the product instructions specifically approve them. Zip ties can help manage loose strap ends, but they are not a substitute for a rated buckle, hook, or bolt.
How to Install a Cargo Net in a 4-Door Jeep Wrangler
Install the cargo net with the rear seat in the position you will use most often. A net that fits with the seat folded may become loose when the seat is raised. A net that fits with the seat upright may restrict access when the seat is folded.
1. Open and inspect the net
Lay the net on a clean surface. Identify:
- Upper straps
- Lower straps
- Hooks or clips
- Buckles
- Adjustment sections
- Labels showing the top or front side
Untangle every strap before you begin. Twisted webbing can make the net sit unevenly and may prevent a buckle from locking fully.
If the net has a defined top edge, place that edge toward the roof. If it is a flat rectangular net, compare its width and length with the cargo area before attaching it.
2. Position the net over the cargo opening
Place the net between the rear seat and the liftgate area, depending on the product design. Keep it behind the rear seat so it does not interfere with the driver or front passenger.
For a net that covers the cargo floor, place it flat over the items. For a vertical divider net, position it across the opening behind the rear seat.
Do not stretch the net across a passenger’s seating position unless the instructions clearly identify it as a passenger-safe divider. Never place netting across a seat belt or in front of an occupied seat.
3. Attach the lower hooks or straps
Connect the lower attachment points to the factory cargo hooks or other approved locations. Work from one side to the other so the net stays centered.
The hook should sit fully inside the approved loop or ring. Do not attach a hook to a thin trim edge, weather seal, plastic panel, or wiring harness.
If the net uses straps, route each strap in the direction shown by the instructions. A strap that passes around a sharp edge can wear through during normal use.
4. Attach the upper points
Attach the upper hooks or straps to the matching factory loops, seat-back points, or other approved mounts. Keep the net level from left to right.
If the net is designed to attach to the rear headrest posts, raise the headrests only as much as needed. Do not force a strap between the headrest and seat in a way that prevents the headrest from locking into place.
The net should not press against the rear window, hardtop panels, or liftgate trim. Contact with those parts can cause rattles and wear.
5. Tighten the net evenly
Tighten each side in small steps. Alternate between the left and right sides so the net remains centered.
The correct tension is firm, not drum-tight. A cargo net needs enough slack to hold items without pulling the anchor points sideways. Excessive tension can damage straps, hooks, or interior panels.
Place a soft item, such as a folded towel, behind the net and press against it by hand. The net should hold the item without its hooks lifting out of the anchors.
6. Check the cargo load
Place heavy items on the floor and low against the rear seat. Use the cargo net to stop smaller items from sliding or falling forward.
Do not use a cargo net to hold:
- Unsecured fuel containers
- Heavy tools
- Sharp metal parts
- Pressurized cylinders
- Large coolers
- Dense equipment that exceeds the stated load limit
If the product has no load rating, treat it as an organizer rather than a heavy-load restraint. Use the Wrangler’s factory tie-down points and separate rated straps for heavy cargo.

How to Install a Dog Barrier in a 4-Door Jeep Wrangler
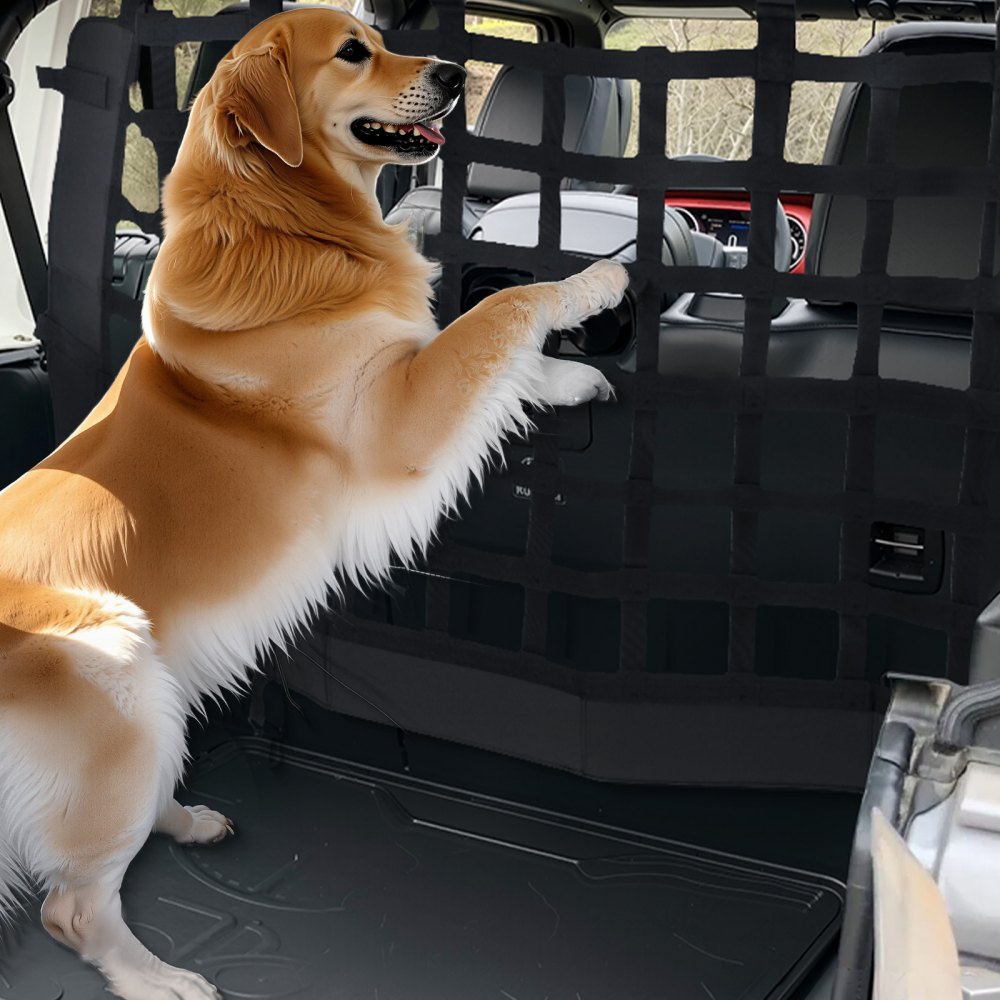
A dog barrier usually mounts behind the rear seat and creates a physical separation between the cargo area and the passenger area. The barrier may be a rigid panel, tubular frame, mesh screen, or strap-based divider.
The installation sequence varies, but the basic method is consistent: place the barrier behind the rear seat, connect the lower mounts, connect the upper mounts, and check that the barrier cannot shift into the passenger area.
1. Set the rear seat and headrests
Put the rear seat backs in the position shown in the instructions. Some barriers require the seat backs to be upright. Others fit with the seats folded.
If the barrier uses headrest posts, adjust the headrests before fitting the upper brackets. The headrests must still lock securely after the barrier is installed.
Do not remove a headrest permanently unless the manufacturer specifically allows it and the vehicle manual confirms that the change is safe. Headrests help reduce neck injury in a collision.
2. Center the barrier
Place the barrier behind the rear seat. Keep equal space on both sides if the design allows adjustment.
Check that the barrier does not touch:
- Seat-belt buckles
- Shoulder belts
- Airbag covers
- Door seals
- Hardtop panels
- Rear window glass
- Liftgate hinges
- Electrical connectors
A barrier that is off-center may look secure but can place uneven force on its mounts.
3. Attach the lower mounts
Connect the lower brackets, hooks, or straps to the approved cargo anchors. Tighten them by hand first.
If the barrier uses bolts, start all bolts before tightening any one bolt fully. This keeps the bracket aligned and reduces the chance of cross-threading.
Do not remove seat-belt bolts or use them as barrier mounts unless the barrier instructions specifically identify those bolts. Seat-belt hardware is safety-critical.
4. Attach the upper mounts
Connect the upper mounts to the approved headrest posts, roof brackets, side mounts, or factory loops.
If a clamp fits around a structural tube, confirm that the instructions name that tube as an attachment location. The Wrangler’s roll-bar structure is not a general-purpose mounting rail.
Make sure each latch, buckle, or bolt is fully engaged. A partially seated hook can release when the vehicle turns, stops, or travels over uneven ground.
5. Adjust the barrier
Tighten the barrier until it stays in place when you push it gently in several directions. It should not rattle heavily or move toward the front seats.
Do not overtighten. Excess force can bend a frame, crush plastic trim, or pull a factory anchor out of alignment.
If the barrier has mesh, check for gaps large enough for a dog’s head or paw to pass through. A small dog may fit through an opening that looks safe for a larger dog.
6. Protect your dog from the barrier itself
A barrier keeps the dog in a defined area, but it can still become a hazard during hard braking. Remove sharp objects from the cargo area and cover exposed metal edges if the product design permits it.
For road travel, use one of these added protections:
- A crash-tested dog harness attached according to its instructions
- A secured, appropriately sized crate
- A travel system designed for vehicle use
Do not attach a dog leash to the cargo net. A leash can tangle around the net or create a neck injury.

Cargo Net vs. Dog Barrier: Which Should You Use?
A cargo net and a dog barrier serve different purposes. The net is mainly for holding loose cargo. The barrier is mainly for separating the dog from the passenger compartment.
| Feature | Cargo net | Dog barrier |
|---|---|---|
| Main purpose | Stops small cargo from moving | Separates the rear cargo area |
| Best location | Over the cargo floor or across an opening | Behind the rear seat |
| Typical material | Webbing or elastic netting | Mesh, tubing, or rigid panel |
| Suitable for heavy loads | Only if rated for that load | Usually not |
| Designed to contain a dog | Usually no | Usually yes, within product limits |
| Replaces a dog harness | No | No |
| Main failure risk | Hooks release or net stretches | Frame shifts or gaps allow escape |
Use both when needed. For example, a barrier can keep a dog in the rear area while a cargo net holds a blanket, small bag, or groceries below the dog’s space. Keep the dog away from loose objects that could cause injury.
How to Test the Installation
Test the setup before taking your dog on the road. A short inspection can reveal a loose hook or twisted strap before it becomes a problem.
Perform a hand-check
Push the cargo net and barrier in these directions:
- Toward the front seats
- Toward the rear liftgate
- Toward the driver’s side
- Toward the passenger side
- Up and down
The mounts may flex slightly, but no hook should lift out. No strap should slide through a buckle. No bolt should turn by hand.
Check the vehicle controls
Confirm that:
- Both rear doors close without touching the barrier
- The liftgate closes normally
- Rear seat belts pull out and retract
- Rear headrests lock in place
- The rear seats latch correctly
- The driver’s rear view remains acceptable
- No warning light appears
- No airbag trim is covered or pressed
- Cargo cannot reach the pedals or front-seat controls
If a barrier blocks the driver’s view, lower or remove it before driving. A pet accessory must not create a new visibility problem.
Take a slow test drive
After the hand-check, drive slowly in a safe area. Listen for movement over a driveway entrance or a mild road bump. Stop and inspect the mounts again.
After the first trip, inspect every strap and hook. Continue checking the setup when you load different cargo, fold the rear seats, or change the dog’s travel position.

Troubleshooting Installation Problems
The cargo net is loose
Possible causes:
- The straps are attached to the wrong anchors.
- The net is installed in the wrong orientation.
- The cargo is too small for the net design.
- One side was tightened more than the other.
- The net is worn or stretched.
What to do:
Remove the load and reinstall the net from the beginning. Center it, attach all points, and tighten both sides evenly. Replace the net if the webbing is cut, frayed, or permanently stretched.
The dog barrier rattles
Possible causes:
- A bolt or buckle is loose.
- The upper mounts are not aligned.
- The barrier is touching hardtop trim.
- A plastic spacer is missing.
- The product is not compatible with the Wrangler model.
What to do:
Check each mount by hand. Look for contact points where the barrier touches the vehicle. Add only the spacers supplied by the manufacturer. Do not add random foam or hardware that could change how the barrier releases or supports a load.
A hook keeps coming out
Stop using the accessory until you find the cause. The hook may be too small for the anchor, the strap may pull at an angle, or the factory anchor may be damaged.
Do not bend the hook with pliers unless the manufacturer gives that instruction. Replace the hook, use the correct adapter, or choose a compatible product.
The rear seats will not latch
The barrier or cargo net may be routed through the seat hinge area. Remove the accessory and inspect the seat latch, hinge, and belt path.
Never force the seat into place. A rear seat that does not latch can move during a collision.
The dog can climb around the barrier
Check the side gaps, roof gap, and floor gap. Some barriers are intended only to discourage movement and cannot contain every dog.
Use a properly secured crate or harness if the barrier leaves a gap that your dog can pass through. Do not alter the barrier with homemade extensions that can create sharp edges or weak points.
Safety Limits and Common Mistakes
Avoid these common installation errors:
- Buying a two-door accessory for a four-door Wrangler
- Mixing parts from different barrier systems
- Attaching to seat-belt bolts without approval
- Covering side-curtain airbag areas
- Using the barrier as a cargo tie-down
- Loading heavy objects above the seat-back
- Leaving loose tools beside the dog
- Connecting a leash to the cargo net
- Driving with an open liftgate
- Blocking the rear seat belts
- Drilling into trim without checking for wiring
- Assuming a product is crash-rated because it feels strong
- Installing the barrier without checking the dog’s size and behavior
The most important boundary is simple: a cargo net or dog barrier is not automatically a crash restraint. The product’s marketing language may describe containment or separation, but that does not establish performance in a crash.
For a serious road-trip setup, combine a barrier with a dog harness or secured crate. Follow the harness or crate instructions, and inspect the attachment point every time.

Maintenance and Removal
Inspect the system at least once each month and before long trips. Inspect it sooner after carrying dirty, wet, or sharp cargo.
Look for:
- Frayed webbing
- Torn mesh
- Bent brackets
- Loose bolts
- Cracked plastic clips
- Corrosion
- Stretched elastic
- Damaged stitching
- Missing hardware
Clean fabric parts with mild soap and water unless the manufacturer gives different care instructions. Let them dry fully before storage.
When removing the barrier, support it with one hand while releasing the mounts with the other. Store the hardware in a labeled bag. Missing spacers or brackets can make the next installation unsafe.
If you remove a barrier for passengers, confirm that all rear seat belts work and that no trim, strap, or bracket is left in the seat latch area.

Frequently Asked Questions
Will a cargo net fit any four-door Jeep Wrangler?
No. Fit depends on the Wrangler generation, model year, body style, and the net’s attachment method. Confirm the product’s fitment for your JK, JL, or JL 4xe before installing it.
Can I install a dog barrier without drilling?
Many aftermarket barriers use factory anchors, headrest posts, straps, or clamps and do not require drilling. Others require permanent brackets. Choose a no-drill system only if its instructions list your exact Wrangler configuration.
Can my dog ride loose behind the barrier?
A barrier may keep the dog in the rear cargo area, but it does not provide crash protection by itself. Use a properly fitted travel harness or a secured crate for added protection.
Can I keep the rear seats folded with the barrier installed?
Only if the barrier instructions allow that position. Folding the seats can change the distance between the mounts and may loosen the barrier or block the cargo floor.
Should I use a cargo net for groceries and heavy tools?
Use a cargo net only within its stated limits. Heavy or sharp objects should be secured with suitable rated straps at the Wrangler’s factory tie-down points and kept low in the cargo area.
What should I do if my Wrangler has a 4xe hybrid system?
Use only an accessory confirmed for the 4xe interior. Do not drill, remove trim, or route hardware near high-voltage components, wiring, or battery-related parts. If the instructions are unclear, ask a Jeep dealer or qualified technician to verify the mounting area.
Final Installation Checklist
Before driving, confirm that:
- The cargo net and barrier match your four-door Wrangler.
- Every hook, strap, buckle, and bolt is fully engaged.
- The barrier does not touch airbags, seat belts, windows, or door seals.
- The rear seats latch correctly.
- The liftgate and rear doors close normally.
- Loose cargo is below the seat-back height when possible.
- The dog has no access to sharp or heavy items.
- The dog uses a suitable harness or secured crate.
- The setup passes a firm hand-check in every direction.
- You know how to remove the system in an emergency.
A correct installation should feel stable, leave the vehicle’s safety systems unobstructed, and remain secure when the Wrangler moves over normal road surfaces. If the accessory does not fit without force, drilling, or improvised hardware, stop and verify compatibility before driving.


