Jeep Wrangler YJ LED Upgrade: Rectangular Headlight Guide
 Reading Time: 14 minutes
Introduction
For a U.S.-spec 1987–1995 Jeep Wrangler YJ, the simplest LED headlight upgrade is a pair of quality 5×7-inch rectangular LED replacement headlights made for the original H6054-style sealed-beam opening. Most kits use the factory three-pin headlight plug, so installation can take less than an hour.
The best result depends on more than brightness. The lamp must fit the YJ bucket, aim correctly, use a safe beam pattern, and meet applicable U.S. lighting rules. A poor LED conversion can create glare, radio noise, flicker, or weak low beams.
This guide explains how to choose, install, aim, and troubleshoot a rectangular LED headlight upgrade on a Jeep YJ.

What You Need to Know About YJ Headlight Fitment
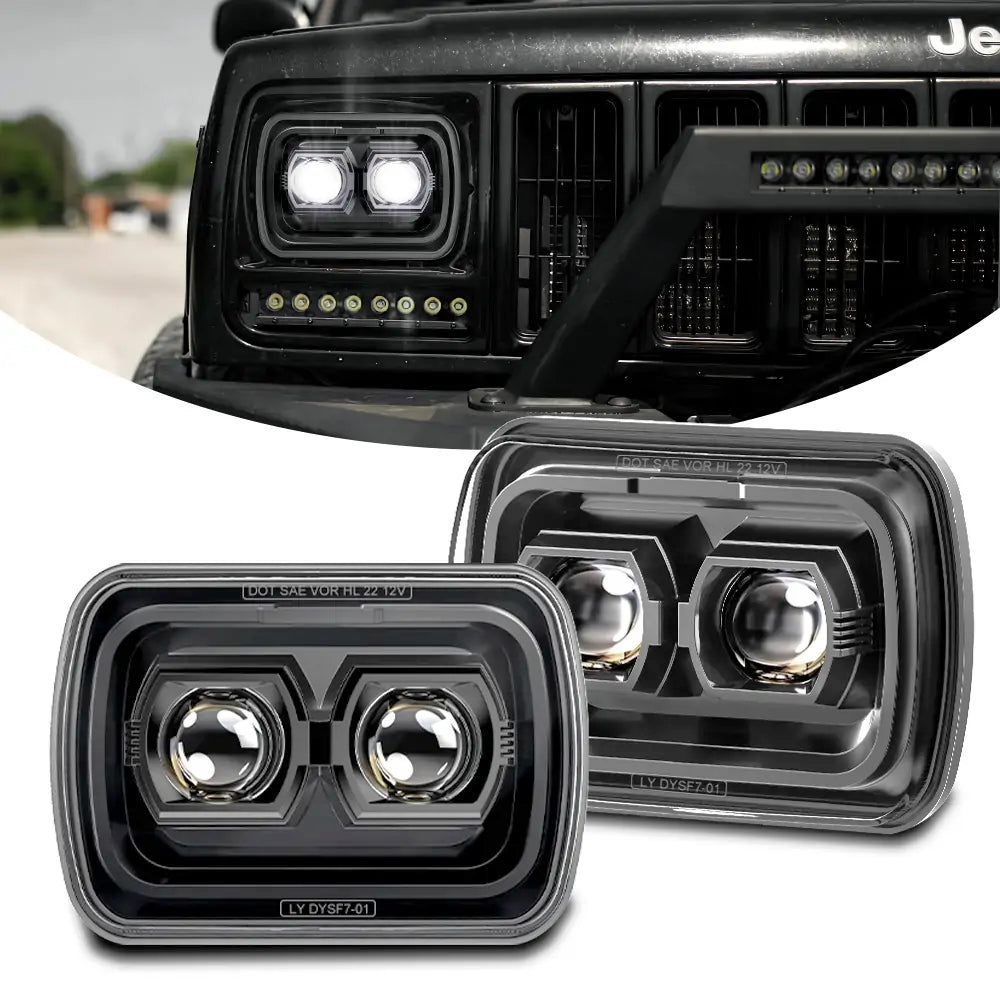
The Jeep Wrangler YJ uses two rectangular headlights mounted in steel or plastic grille buckets. The common replacement size is 5×7 inches, also called 7×6 inches in some parts listings.
The 1987–1995 YJ normally uses a three-terminal headlight connector:
- Ground
- Low-beam power
- High-beam power
The factory lighting system uses a sealed-beam design. A sealed beam contains the reflector, lens, and filament in one unit. An LED replacement keeps the same outer mounting size but uses LED emitters and an electronic driver inside the housing.
Confirm your Jeep before ordering
Check these items first:
- Model: Jeep Wrangler YJ.
- Model year: Generally 1987 through 1995.
- Headlight shape: Rectangular, not round.
- Lamp size: 5×7-inch or H6054-style.
- Plug: Three-pin headlight connector.
- Mounting: Retaining ring and original screw locations.
- Electrical system: Usually 12 volts, negative ground.
Some YJs may have aftermarket grilles, custom wiring, extra relays, or previous repairs. Do not assume the wiring is original. Inspect the connector and harness before buying parts.
LED headlight terms explained
The following terms appear often in U.S. product listings:
- Plug-and-play: Uses the factory headlight connector without cutting wires.
- DOT marked: The maker states that the lamp meets applicable U.S. requirements. A marking alone is not proof of good beam performance.
- SAE marked: The lamp carries markings tied to lighting performance standards. Check the actual marking and product documentation.
- Beam pattern: The shape and cutoff of light on the road.
- Color temperature: The apparent color of the light, measured in kelvin. A lower number looks warmer; a higher number looks bluer.
- EMI: Electromagnetic interference that can affect radios or other electronics.
- IP rating: A housing protection rating against dust and water under stated test conditions.
Do not choose a lamp only by its advertised lumen number. Beam control, low-beam cutoff, weather sealing, and correct aim matter more on public roads.
How to Choose the Right LED Headlights
Choose a lamp with the correct size, connector, beam pattern, and U.S. road-use documentation. A bright lamp with poor optics can reduce safety by putting light into the eyes of oncoming drivers.
Use this buying checklist
| Feature | What to look for | Why it matters |
|---|---|---|
| Size | 5×7-inch or H6054 fitment | Prevents mounting problems |
| Connector | Factory-style three-pin plug | Avoids unnecessary wire cutting |
| Beam | Separate, controlled low and high beams | Improves road visibility |
| Compliance | Clear U.S. road-use statement and markings | Helps with legal and inspection concerns |
| Housing | Sealed or weather-resistant construction | Protects the electronics |
| Aim adjustment | Compatible rear or side adjustment points | Allows proper beam alignment |
| Warranty | Written warranty and support contact | Helps if the driver or LEDs fail |
| Current draw | Published electrical data | Helps assess wiring and charging load |
| Radio behavior | EMI information or user reports | Reduces the chance of interference |
Avoid extreme color temperatures
A neutral white lamp around 5,000K to 6,000K often gives a clear appearance without the strong blue tint found in some higher-temperature lamps. A blue-looking lamp is not automatically brighter or safer.
Very blue light may create more glare in rain, fog, or snow. It can also attract attention from law enforcement if the lamp appears outside the expected white-light range.
Check the low-beam pattern
The low beam is the most important setting for normal driving. Look for:
- A clear cutoff.
- More light directed toward the road and shoulder.
- No large bright spots above the cutoff.
- Similar left and right beam shapes.
- A high beam that adds distance without losing the low beam.
A product listing may show a “DOT” claim but provide no useful beam photos or test information. Treat that as a reason to investigate further, not as proof that the lamp performs well.
Replace both headlights together
Install matching headlights as a pair. Mixing one old sealed beam with one LED lamp can create different beam shapes and colors. It can also make aiming harder because the two lamps may respond differently to the adjustment screws.
Keep the original lamps as emergency spares if they still work. Store them in a dry, protected place.

Tools and Parts for the Installation
You usually need only basic hand tools for a direct replacement:
- Two 5×7-inch LED headlights
- Phillips screwdriver
- Flat screwdriver or trim tool
- Multimeter or 12-volt test light
- Clean gloves
- Electrical contact cleaner
- Painter’s tape
- A wall or garage door for beam aiming
You may also need:
- Replacement three-pin connector
- Headlight relay harness
- Crimp tool and heat-shrink tubing
- Fuse holder and correctly sized fuse
- Dielectric grease for the connector seal
Disconnect the negative battery cable before repairing or modifying wiring. Do not work on the headlight circuit with tools that can bridge the battery terminal to the body.

Step-by-Step: Install LED Headlights on a Jeep YJ
The direct replacement process is simple, but careful wiring and final aiming determine the result.
1. Park on level ground
Park the Jeep on a flat surface facing a vertical wall or closed garage door. Leave enough room to drive backward and forward without changing the ground angle.
Set the tire pressures to normal driving levels. Remove heavy cargo that you do not usually carry. If the Jeep has a winch, lift, or suspension change, account for its normal ride height.
2. Disconnect the battery
Turn off the ignition and lights. Disconnect the negative battery cable.
This step reduces the chance of a short while you handle the metal retaining ring or connector. Wait briefly for any electronic components to discharge.
3. Remove the headlight trim ring
The YJ headlight is held in place by a trim or retaining ring. Remove the screws that hold the ring, then support the lamp as you loosen the last screw.
Do not turn the adjustment screws unless necessary. The adjustment screws set the beam direction. The retaining ring holds the lamp in the grille.
4. Unplug the original lamp
Pull the three-pin connector straight back from the sealed beam. Inspect it for:
- Burned terminals
- Loose pins
- Green corrosion
- Cracked plastic
- Signs of heat damage
A damaged connector can cause flicker, voltage loss, or a hot terminal after the LED upgrade. Replace it before installing the new lamp if the pins are loose or burned.
5. Clean and inspect the mounting area
Remove dirt, rust flakes, and debris from the headlight bucket. Check that the mounting tabs are not bent.
Do not force a lamp into the opening. If the housing does not sit flat, check for an incorrect size, a bent bucket, or an aftermarket grille that uses a different mount.
6. Connect the LED headlight
Plug the factory connector into the LED lamp. The connector should fit firmly and in only one correct direction.
If the lamp has a separate driver box, mount it away from:
- Exhaust heat
- Sharp edges
- Moving belts
- Water spray
- Loose wiring
Secure the driver with a suitable mount or tie. Do not leave it hanging from the headlight connector.
7. Install the retaining ring
Set the lamp into the bucket. Install the retaining ring and tighten the screws evenly.
Do not overtighten small grille screws. Excess force can strip the threads or crack a plastic grille. The lamp should be held firmly but should not be crushed or distorted.
8. Reconnect the battery and test the lights
Reconnect the negative battery cable. Test:
- Parking lights
- Low beams
- High beams
- High-beam indicator
- Both lamps at the same time
- Turn signals and hazard lights
The LED lamps should switch between low and high beam without flicker. If only one beam works, switch the lamps from side to side. This helps determine whether the fault is in the lamp or the Jeep’s wiring.
9. Aim the headlights
A new headlight is not finished until it is aimed. Follow the procedure below before driving at night.

How to Aim YJ LED Headlights Correctly
Aim the headlights on a level surface with the Jeep in normal driving condition. Incorrect aim is one of the most common problems after an LED conversion.
Basic wall-aiming method
- Park about 25 feet from a flat wall.
- Measure from the ground to the center of each headlight.
- Mark the headlight center height on the wall.
- Mark the Jeep centerline and the centerline of each lamp.
- Turn on the low beams.
- Adjust the lamps so the main cutoff sits slightly below the headlight center marks.
- Keep the left and right beam heights even.
- Confirm that the bright portion of each low beam points toward its lane and shoulder without shining high into the opposite lane.
The exact aiming specification can vary by lamp design and local rules. Use the headlight manufacturer’s instructions if they provide a specific method.
Check aim on the road
After wall aiming, drive on a dark road with no traffic. The low beam should light the road ahead without a sharp bright patch in the eyes of other drivers.
If other drivers flash their high beams at you, check the aim first. Do not solve glare by covering the lamp or changing the beam pattern without understanding the cause.

When a Relay Harness Is Worth Adding
A relay harness can help when the factory circuit has voltage loss, old connectors, or thin wiring. It uses the original headlight circuit as a control signal and sends power to the lamps through relays and heavier wire.
A relay harness may be useful if:
- The lamps are dim.
- Voltage at the headlight plug is much lower than battery voltage.
- The connector is hot after use.
- The Jeep has old or repaired wiring.
- You want to reduce current through the original switch.
A relay harness is not required for every LED headlight. LEDs often draw less current than the original sealed beams, but the need depends on the lamp design and the condition of the Jeep’s wiring.
Relay harness safety rules
Use a harness with:
- A fuse close to the battery.
- Correct wire size.
- Proper grounds.
- Weather-protected connections.
- Relays rated for the circuit load.
- Separate control of low and high beams where required.
Do not install a larger fuse simply because the original fuse blows. A larger fuse can allow unsafe current through damaged wiring. Find the short or overload instead.
If you build a harness, follow the lamp maker’s current data and accepted automotive wiring practices. A qualified automotive electrician is the safer choice when the Jeep has modified wiring or repeated electrical faults.

Troubleshooting LED Headlight Problems
Check the simple causes first: connector fit, ground quality, polarity, lamp position, and aim.
| Symptom | Likely causes | First checks |
|---|---|---|
| One lamp does not turn on | Loose plug, bad ground, failed lamp | Swap sides and test voltage |
| Low beam works but high beam does not | High-beam terminal or internal driver fault | Test the high-beam wire |
| High beam works but low beam does not | Low-beam terminal or driver fault | Test low-beam power |
| Both lamps flicker | Loose ground, poor relay, unstable driver | Inspect grounds and battery voltage |
| Radio noise appears | LED driver EMI | Move driver, improve grounding, contact maker |
| Lamp goes dark after warming up | Thermal protection or failed driver | Check heat, airflow, and warranty |
| Uneven light pattern | Incorrect seating or poor optics | Reseat lamp and inspect aim |
| Fuse blows | Short, damaged wire, wrong harness | Stop and find the fault |
| Condensation inside lamp | Temperature change or seal failure | Check manufacturer guidance and warranty |
Use a multimeter safely
With the lights on, measure voltage at the headlight connector and compare it with battery voltage. A large difference suggests resistance in the switch, connector, ground, or wiring.
Avoid guessing at terminal positions. Use the Jeep wiring diagram for your model year or test each terminal with a meter. Do not pierce insulation unless you can seal the opening afterward.
What if the LED lamp does not work?
First, turn off the lights and inspect the plug. Then:
- Reconnect the lamp firmly.
- Check the ground terminal.
- Test the lamp on the opposite side.
- Check for voltage on low and high beam terminals.
- Inspect the fuse and switch.
- Test with the original sealed beam if available.
If the original lamp works but the LED lamp fails on both sides, the LED unit may be defective or incompatible. Contact the manufacturer rather than modifying the plug.

Common Mistakes to Avoid
The most common errors involve fitment, aim, and unsupported electrical modifications.
Buying a round JK or TJ lamp by mistake
The Wrangler YJ uses rectangular headlights from the factory. Round 7-inch lamps for a TJ, CJ, or other Jeep will not replace a YJ rectangular lamp without grille or conversion work.
Trusting lumen claims alone
Advertised lumens may describe LED output under a test condition rather than useful light on the road. The beam pattern and cutoff are more useful for judging safety.
Installing bulbs into an original sealed beam
A sealed-beam headlight is not designed to accept a replaceable LED bulb. A proper upgrade uses a complete LED headlight housing.
Ignoring the ground
Old grounds can corrode even when the lamp appears connected. A poor ground can cause flicker, dim output, or strange high-beam behavior.
Leaving the lights un-aimed
A lamp can fit perfectly and still point too high. Always aim both lamps after installation.
Cutting the factory harness too soon
Use a plug-and-play lamp when possible. Preserve the original connector so the Jeep can return to stock or accept another lamp later.
Assuming a “DOT” label guarantees quality
For road use in the United States, look for clear compliance information and proper markings. Also inspect the beam pattern and follow local inspection rules. A label does not replace correct installation and aim.

U.S. Road-Use and Compliance Notes
Federal lighting rules for vehicles sold or operated in the United States are addressed under FMVSS No. 108, administered by the National Highway Traffic Safety Administration. State inspection and equipment rules may add requirements.
Before buying, review:
- The lamp’s actual markings.
- The manufacturer’s U.S. compliance statement.
- Your state inspection rules.
- Any restrictions on color, glare, or headlight modifications.
Avoid lamps marketed mainly for off-road use if you plan to drive on public roads. Off-road lamps may have a flood pattern, colored output, or high-power design that is not suitable for normal traffic.
For official information, consult the NHTSA lighting standards page and the applicable federal regulation in the Electronic Code of Federal Regulations.

Cost, Performance, and Maintenance Trade-Offs
A basic sealed-beam replacement is usually the least expensive option. A complete LED housing costs more, but it may provide better light control, lower power use, and longer service life when properly designed.
The main trade-offs are:
- Cost: Better optics, sealing, and warranty support often raise the price.
- Reliability: Electronics can fail even when the LEDs themselves last a long time.
- Brightness: More output is useful only when the beam puts it on the road.
- Electrical load: Many LEDs use less power, but check the maker’s specifications.
- Maintenance: LED lamps do not usually need bulb changes, but the housing still needs cleaning and inspection.
- Compatibility: Some lamps need adapters, special brackets, or a relay harness.
A sensible choice for a daily-driven YJ is a pair of matching, road-use rectangular lamps with a controlled low beam, a sealed housing, a known connector fit, and a written warranty.

Frequently Asked Questions
What size LED headlights fit a Jeep Wrangler YJ?
Most factory-style YJ replacements use a 5×7-inch rectangular housing, often listed as an H6054 replacement. Confirm the size and mounting design before ordering, especially if the Jeep has an aftermarket grille.
Do LED headlights need a relay harness on a YJ?
Not always. A direct-fit LED lamp may work with the factory circuit. A relay harness can help if the Jeep has voltage loss, old connectors, damaged wiring, or a weak switch circuit. Test the system before adding parts.
Can I install LED bulbs in the stock YJ headlights?
No. The stock sealed-beam unit is a complete lamp, not a bulb housing. Use a complete LED replacement headlight designed for the 5×7 opening.
Why are my new LED headlights flickering?
Common causes include a loose connector, weak ground, damaged wiring, unstable LED drivers, or an incompatible relay harness. Swap the lamps side to side and inspect voltage and grounds before replacing parts.
Are LED headlights legal on a Jeep YJ?
Legality depends on the lamp’s compliance, installation, beam aim, and state rules. Choose a lamp with clear U.S. road-use information, install it correctly, and verify local inspection requirements.
Final Recommendation
For most U.S. Jeep Wrangler YJ owners, the best upgrade path is a matched pair of 5×7-inch plug-in LED headlights with a controlled low beam, reliable weather sealing, and clear road-use documentation.
Inspect the factory connector before installation, avoid cutting the harness unless needed, and aim the headlights on a level surface. If the lights flicker, interfere with the radio, or fail to produce a clean beam, troubleshoot the wiring and lamp pattern before driving at night.
The next step is simple: confirm your YJ’s model year and headlight opening, inspect the three-pin connector, then choose a complete LED housing that matches the original mounting and electrical layout.


