
How To Install Jeep Wrangler Underglow: Wheel Well Guide
 Reading Time: 15 minutes
For Jeep Wrangler owners in the United States, underglow and wheel well lights can add useful trail lighting and a custom look. The cleanest installation uses low-voltage LED light strips or rock lights, an inline fuse near the battery, weatherproof connectors, and wiring secured away from heat and moving parts.
The basic process is:
- Choose a 12-volt lighting kit made for vehicle use.
- Plan the light locations and wire routes.
- Disconnect the battery.
- Mount the lights.
- Route and protect the wires.
- Connect the fuse, switch, and ground.
- Test the system before driving.
This guide applies mainly to Jeep Wrangler TJ, JK, JL, and similar 12-volt models. Wire colors, fuse locations, factory connectors, and available mounting points vary by year. Always check the owner’s manual and the light manufacturer’s wiring diagram before making connections.

What You Need Before Installing Wrangler Underglow Lights
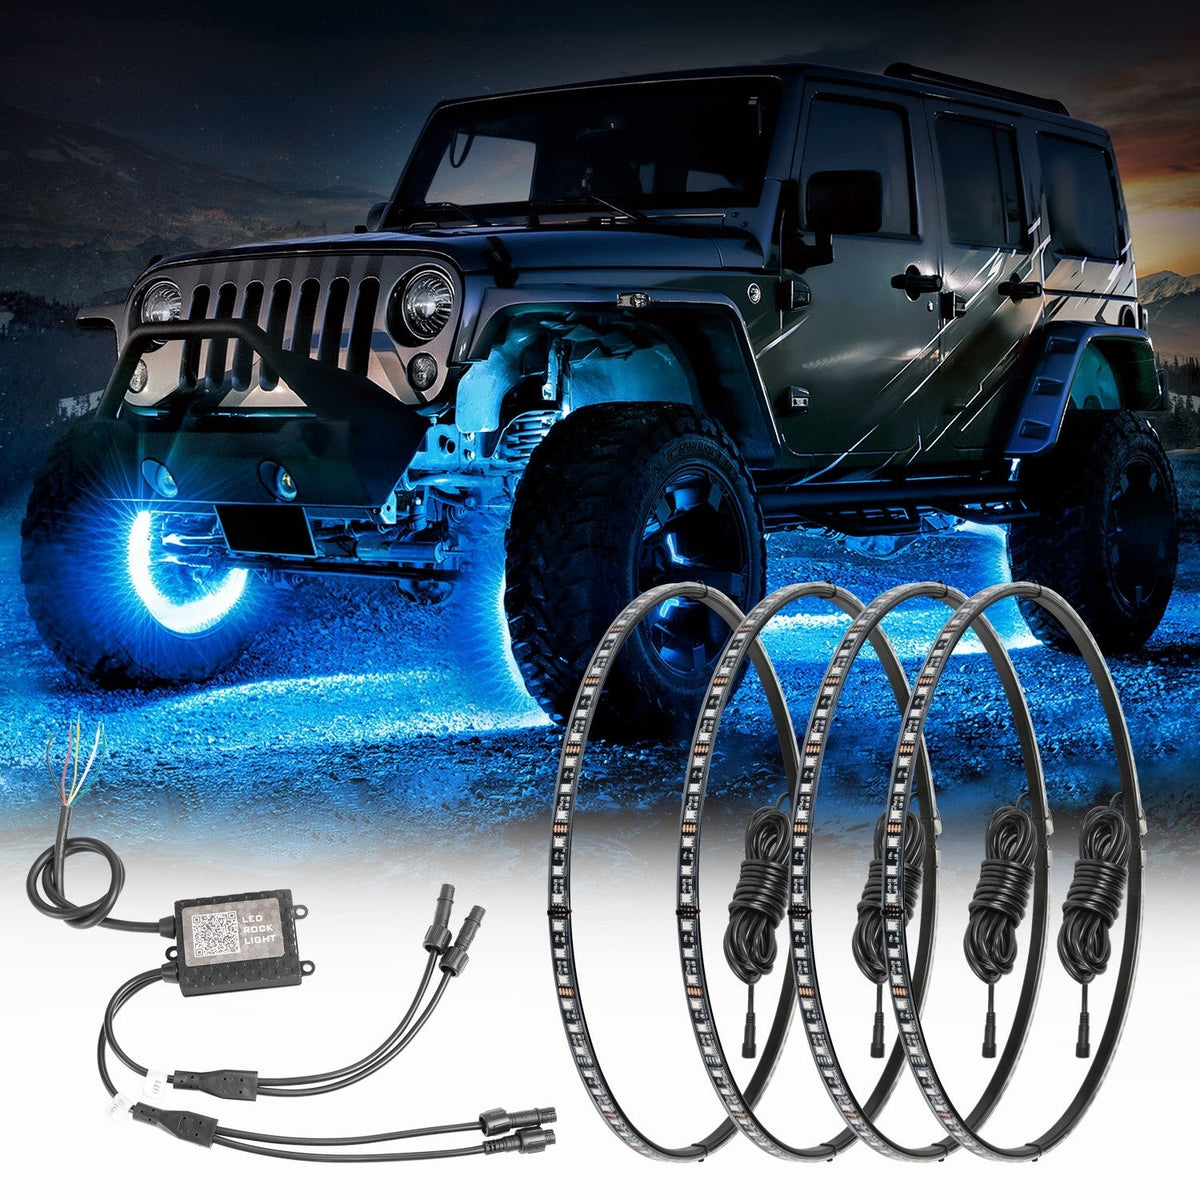
Gather all parts and tools before removing panels or drilling holes. A complete kit may include LED strips, rock lights, a wiring harness, a fuse holder, a relay, a switch, and a remote or app controller.
Parts
- 12-volt LED underglow or rock lights
- Inline fuse holder
- Correct fuse for the light kit
- Automotive relay, if required by the kit
- On/off switch or approved controller
- Automotive wire with suitable insulation
- Ring terminals
- Heat-shrink butt connectors
- Weatherproof plugs or Deutsch-style connectors
- Split loom or braided wire sleeve
- Cable ties
- Rubber grommets
- Self-tapping screws or rivet nuts, if needed
- Dielectric grease for exposed connectors
Tools
- Socket set
- Screwdrivers
- Wire stripper and crimper
- Multimeter or test light
- Drill and drill bits
- Trim removal tools
- Heat gun
- Electrical tape
- Torque wrench, if removing factory fasteners
- Safety glasses and gloves
Choose a kit with a stated 12-volt vehicle input. Do not connect a lighting kit designed only for a different voltage. If the kit includes an app, controller, or special adapter, follow that product’s wiring instructions.
The lights should also be rated for outdoor use. Look for sealed housings, potted electronics, and an ingress protection rating such as IP67. An IP rating does not make a light indestructible, but it gives more protection from water and dust than an indoor LED product.
Plan the Light Locations and Power Circuit
Good planning prevents most installation problems. Before drilling or sticking anything in place, hold each light against the Jeep and check its beam angle, clearance, and wire path.
Common mounting locations
For underbody lighting, installers often use:
- Inside the frame rails
- Beneath the rocker panels
- Near the front and rear crossmembers
- Behind the front and rear bumpers
- Along protected portions of the body mounts
For wheel well lighting, common locations include:
- Inside the front wheel wells
- Inside the rear wheel wells
- Near the upper inner fender area
- On protected frame or suspension brackets
- Near the axle or control-arm area, only when full movement has been checked
Do not place a light where it can contact a tire, steering link, drive shaft, exhaust pipe, shock, spring, or control arm. A light that is safe while parked may be damaged when the suspension compresses or the steering reaches full lock.
Plan separate zones
A four-door Wrangler may benefit from separate front, rear, and side zones. A simple layout could include:
| Zone | Typical lights | Wiring concern |
|---|---|---|
| Front wheel wells | 2 | Steering and tire clearance |
| Rear wheel wells | 2 | Suspension travel and mud exposure |
| Driver side underbody | 1–2 | Frame and exhaust clearance |
| Passenger side underbody | 1–2 | Exhaust heat on some models |
A multi-zone controller can turn areas on separately. A basic switch is simpler and has fewer parts that can fail.
Estimate current draw
Use the light manufacturer’s current rating. If a kit uses 12 volts and draws 5 amps, its approximate electrical load is:
12 volts × 5 amps = 60 watts
The fuse must protect the wire. It should not be chosen only because it matches the lamp’s name or appearance. Follow the kit instructions first. If no fuse size is supplied, use the manufacturer’s current rating and choose a fuse that protects the wire while allowing normal startup current.
Avoid placing a new lighting circuit on a factory fuse that already carries a heavy load. A dedicated fused circuit from the battery is usually easier to inspect and less likely to overload an existing circuit.

Disconnect the Battery and Prepare the Jeep
Park the Wrangler on a level surface. Set the parking brake and place the transmission in Park or in gear. Turn off the ignition and remove the key or key fob from the work area.
If you must raise the Jeep, use a level surface, properly rated jack stands, and wheel chocks. Never rely on a floor jack alone.
Before working on the wiring:
- Photograph the planned wire paths.
- Wash or wipe dirt from the mounting areas.
- Let the surfaces dry.
- Disconnect the negative battery cable.
- Wait several minutes before working near airbag wiring or other sensitive systems.
Use caution around yellow electrical connectors and harnesses. Yellow wiring is commonly associated with supplemental restraint system components. Do not probe, cut, or reroute those wires.
Do not install a light inside the engine bay unless the product is designed for that heat and exposure. Most underglow kits should stay below the body and away from the exhaust.

Install the Underglow and Wheel Well Lights
Install the lights one zone at a time. This makes it easier to find a loose connection or reversed wire.
1. Test the kit before mounting it
Temporarily connect the lights according to the kit instructions. Use a small fused test lead or the supplied harness. Confirm that:
- Every light turns on
- The controller responds
- Color modes work, if included
- The wires reach the planned locations
- No connector is missing
- The light output is even
Testing first avoids permanently mounting a defective light.
2. Clean the mounting surface
For adhesive-backed lights, clean the surface with a product approved for automotive finishes. Remove grease, mud, wax, and loose paint.
Adhesive alone may not hold on a dirty or textured surface. For off-road use, add mechanical fasteners when the light design allows it. Do not drill into the frame without checking both sides for fuel lines, brake lines, wiring, and structural restrictions.
3. Mount the lights
Keep the light lens facing the ground or the target area. Avoid pointing bright light directly into traffic.
For wheel well lights, mount the housing high and toward the inner fender when possible. This position can reduce direct impact from rocks and mud. Leave enough clearance for:
- Full left and right steering lock
- Full suspension compression
- Full suspension droop
- Tire replacement or rotation
- Brake and axle movement
A simple clearance check helps. With the front axle safely supported, turn the steering from full left to full right. Watch the tire, steering link, light housing, and cable. For suspension travel, inspect the area at normal ride height and at the available compressed and extended positions. If you cannot safely check travel, ask a qualified Jeep shop to inspect it.
4. Route the wires
Run wires along protected paths. Use split loom or braided sleeve where the harness may rub against metal.
Secure the harness with cable ties or proper clamps at regular intervals. Keep it away from:
- Exhaust pipes and catalytic converters
- Driveshafts
- Steering shafts
- Axle shafts
- Springs and shocks
- Sharp body edges
- Brake lines
- Fuel lines
- Tire sidewalls
Leave enough slack near the axle and suspension for normal movement. Too little slack can pull a connector apart. Too much slack can hang below the Jeep and catch on rocks.
5. Protect pass-through points
If wires pass through sheet metal, install a rubber grommet. A bare metal hole can cut insulation over time and create a short circuit.
Seal the opening with a suitable automotive sealant when needed. Do not seal a connector in a way that traps water inside it. A weatherproof connector should remain serviceable and should be installed according to its manufacturer’s instructions.

Wire the Fuse, Switch, Relay, and Ground
The safest basic circuit has battery power, a fuse near the battery, a switch or controller, the light circuit, and a solid ground.
Basic wiring layout
A typical arrangement is:
Battery positive
      |
   Inline fuse
      |
 Switch or relay/controller
      |
  LED light harness
      |
Vehicle ground or battery negative
Some kits place the relay before the controller. Others use a control module that already manages the load. Follow the supplied diagram instead of combining parts from different kits without checking compatibility.
Place the fuse close to the battery
Install the main fuse holder close to the battery positive terminal. This limits the length of unfused wire. If that wire rubs through and touches the body, a nearby fuse can interrupt the circuit sooner.
Never replace a blown fuse with a larger fuse just to keep the lights on. A larger fuse may allow the wire to overheat before the fuse opens.
Choose a switch location
Good switch locations are easy to reach but do not interfere with:
- Steering
- Airbag deployment areas
- Shifter movement
- Factory controls
- Door or dashboard trim
A factory-style switch can provide a neat finish, but its connector and pin layout must match the circuit. A switch rated for low current may need to control a relay instead of carrying the full lamp load.
Use a relay when appropriate
A relay allows a low-current switch or controller to operate a higher-current lighting circuit. Use one when:
- The kit specifies a relay.
- The total current is more than the switch rating.
- The controller is not designed to carry the full load.
- The wire run is long.
Mount the relay in a protected location. Do not leave it hanging near the exhaust or in a low spot where water can collect.
Ground the circuit correctly
A ground connection must touch clean, bare metal or a verified factory ground point. Paint, rust, and powder coating can block current.
Use a properly sized ring terminal. Tighten the fastener firmly, but do not strip the threads. After testing, protect the connection from corrosion. A poor ground often causes flickering, dim lights, random controller resets, or lights that work only when the Jeep moves.

Connect the Wiring and Seal the Terminals
Make each connection strong enough to handle vibration, water, and temperature changes. A Jeep used on trails places more stress on wiring than a vehicle used only on paved roads.
Recommended connection method
- Cut the wire cleanly.
- Strip only the amount required by the terminal.
- Crimp the terminal with the correct tool.
- Pull lightly to check the crimp.
- Apply heat to the heat-shrink seal.
- Add wire loom where rubbing may occur.
- Secure the harness so the terminals do not carry the wire’s weight.
Avoid twisting wires together and covering them with tape. That method can admit water and loosen under vibration.
Use dielectric grease around the seal of suitable weatherproof connectors. Dielectric grease is not a substitute for a good crimp or a proper seal. It helps reduce moisture intrusion and corrosion when used as directed.
Keep connectors above likely splash zones when possible. If a connector must sit low, point the opening downward so water does not pool inside it.

Test the Jeep Wrangler Lighting System
Reconnect the battery only after the wiring is complete and secured.
Test the system in this order:
- Confirm that the fuse is installed.
- Turn the switch or controller off.
- Reconnect the negative battery cable.
- Turn the lights on.
- Check every lamp.
- Inspect the harness for heat, rubbing, or movement.
- Test each color and mode.
- Turn the lights off and confirm they shut down fully.
- Check for battery drain after the controller powers down.
Use a multimeter to check voltage at the light input if a lamp does not work. Follow the circuit from the battery toward the light. This helps identify whether the fault is at the fuse, switch, controller, ground, connector, or lamp.
Signs of a successful installation
A finished system should have:
- Even light output
- No flicker when the engine runs
- No loose wires
- No contact with moving parts
- No wire near a hot exhaust component
- A fuse that remains intact
- A switch or controller that works as intended
- Lights that turn off when commanded
- No warning lights or electrical faults
Drive slowly over a private area or driveway first. Recheck the wiring after the first short trip. Off-road vibration can reveal problems that are not visible while the Jeep is parked.
Troubleshoot Common Underglow Problems
Use the safest and simplest checks first. Disconnect the battery before repairing exposed or damaged wiring.
| Symptom | Likely causes | Useful checks |
|---|---|---|
| No lights work | Blown fuse, bad ground, disconnected power wire | Check fuse, battery voltage, ground, and main connector |
| One light stays dark | Loose plug, damaged branch wire, failed lamp | Swap the connector with a known-good light if the kit allows it |
| Lights flicker | Weak ground, loose crimp, damaged wire | Inspect grounds and pull-test each terminal |
| Fuse blows at once | Short circuit, wrong connection, pinched wire | Disconnect zones and inspect the harness before replacing the fuse |
| Lights work only with the engine running | Low battery voltage, poor connection, controller issue | Measure battery and light voltage with a multimeter |
| Controller will not pair | No controller power, app problem, incompatible controller | Check power, reset instructions, phone permissions, and product compatibility |
| Lights stay on after shutdown | Wrong switched-power source, stuck relay, controller memory function | Check the wiring diagram and relay contacts |
| Lights become hot | Excess current, blocked housing, unsuitable product | Turn them off and inspect the product rating and circuit load |
| Water causes failure | Poor connector seal or damaged housing | Replace the damaged part and reroute it away from direct spray |
Do not keep replacing fuses while a short remains. Find and repair the cause first. If the harness becomes hot, smells like melting insulation, or shows signs of smoke, disconnect the battery when safe and stop using the system.
A qualified automotive electrician or Jeep technician should inspect the vehicle if the installation affects factory wiring, airbag systems, charging circuits, or repeated fuse failures.
Make the Installation Legal and Trail-Ready
Underglow lighting laws differ across the United States. Some states restrict certain colors, flashing patterns, visible light from the front or rear, or use on public roads. Emergency colors such as red, blue, or combinations that resemble police lighting may receive special restrictions.
Check your state’s vehicle code before using the lights on public roads. The National Highway Traffic Safety Administration’s Federal Motor Vehicle Safety Standard No. 108 covers required and permitted vehicle lighting equipment, but state laws can add rules for decorative lighting. Federal equipment requirements and state road-use rules are not the same thing.
A practical approach is to:
- Use white or a permitted color when required.
- Avoid red or blue forward-facing light.
- Turn decorative lighting off on public roads when unsure.
- Never use rapid flashing patterns on public streets.
- Check local off-road park rules.
- Keep the lights from creating glare for other drivers.
For trail use, protect the lights with rock guards or recessed mounting when possible. Carry spare fuses, a few connectors, electrical tape, and a short length of wire. Inspect the harness after mud runs, deep water, and rock crawling.
Common Installation Mistakes to Avoid
The most common problems come from poor wire protection and weak connections, not from the LED lamps themselves.
Using an indoor LED strip
Indoor strips may not tolerate water, mud, vibration, or temperature changes. Use products rated for exterior vehicle use.
Skipping the fuse
A fuse is not optional. It protects the power wire if the harness shorts against the body. Install it close to the power source.
Tapping an unknown factory wire
A wire that appears convenient may feed a sensitive module or a circuit with little spare capacity. Use a documented accessory circuit or a separate fused harness.
Mounting near the tire
The tire may touch a light only during a turn, axle flex, or suspension compression. Check all positions, not just the parked position.
Relying on adhesive alone
Mud, heat, and pressure washing can loosen adhesive. Clean the surface and add mechanical support when practical.
Leaving wires loose
Loose wires can snag on branches, rocks, or suspension parts. They can also rub through their insulation.
Using household wire connectors
Many household connectors are not made for engine-bay moisture or vehicle vibration. Use automotive terminals and sealed connectors.
Installing lights where they glare
The brightest position is not always the best position. Aim the light down and keep it from shining into the eyes of other drivers or trail users.
Frequently Asked Questions
Can I wire Wrangler underglow lights to the battery?
Yes, but the positive wire must have an inline fuse installed close to the battery. Use a switch, relay, or controller so the lights cannot remain on by accident. A battery connection without proper fuse protection is unsafe.
Should wheel well lights be wired to the parking lights?
That depends on the kit and the intended use. A parking-light connection may turn the system on whenever the vehicle lights are on, but it can also create road-use and visibility concerns. A separate interior switch is often easier to control. Follow the wiring diagram and check your state’s lighting rules.
Do I need a relay for LED rock lights?
Not always. Small LED systems may work through a correctly rated switch or controller. Use a relay when the manufacturer requires one, when total current exceeds the switch rating, or when the wire run is long.
Can I install underglow lights without drilling?
Often, yes. Some lights mount with adhesive, clamps, existing bolts, or factory holes. Adhesive-only mounting may be less durable on a Jeep used off-road. Do not use a factory bolt unless it can safely support the light and does not secure a critical component.
How do I keep water out of the wiring?
Use sealed automotive connectors, heat-shrink terminals, grommets, wire loom, and secure mounting. Route connectors away from direct spray when possible. Inspect the system after deep water crossings and pressure washing.
Will underglow lights drain my Jeep’s battery?
They can if left on for a long time or if the circuit remains powered after shutdown. Use a switched circuit or controller with a reliable sleep mode. Check that the lights turn fully off, not just dim, after the Jeep is parked.
Can I use underglow lights on public roads?
The answer depends on the state, color, flash pattern, mounting position, and visibility. Check the current laws where the Jeep is registered and operated. When the rule is unclear, switch decorative lighting off on public roads.
Final Installation Checklist
Before using the Jeep, confirm the following:
- The light kit is rated for 12-volt automotive use.
- The main positive wire has a fuse near the battery.
- The fuse size matches the kit and wire requirements.
- The ground connection is clean and secure.
- All crimps are tight and sealed.
- Wires are protected with loom where needed.
- No wire touches the exhaust, tire, driveshaft, or steering parts.
- Steering and suspension movement have been checked.
- Every light works.
- The controller or switch turns the system off.
- The lights do not create unsafe glare.
- The setup follows applicable state and trail rules.
A neat wiring plan is more valuable than extra lights. Start with a fused circuit, mount each light above moving and hot parts, seal every connection, and test the Jeep before driving at speed or heading onto a trail.
Sources for Vehicle and Lighting Verification
For model-specific details, verify the installation against:
- Jeep Owner’s Manuals for factory wiring, fuse information, and safety warnings
- NHTSA Federal Motor Vehicle Safety Standard No. 108 for federal vehicle lighting requirements
- The light manufacturer’s installation guide for current draw, fuse size, connector layout, and controller requirements
- The vehicle code for the state where the Jeep is registered and operated
Conclusion
Installing underglow and wheel well lights on a Jeep Wrangler is a manageable project when the wiring is treated like any other vehicle electrical system. Use a fused power feed, a sound ground, sealed connectors, and careful clearance checks. After installation, inspect the system often, especially if the Jeep sees mud, water, rocks, or heavy suspension movement.