How to Wire a Torque Converter Lockup Switch: Step-by-Step Guide
If you’re working on your vehicle and want to improve fuel efficiency or reduce transmission heat, wiring a torque converter lockup switch is a smart upgrade you should consider. But maybe you’re wondering how to do it right—without causing damage or frustration.
This guide will walk you through the exact steps to wire your torque converter lockup switch clearly and safely. By the end, you’ll feel confident handling this task yourself, saving money and gaining better control over your vehicle’s performance. Ready to unlock the secrets behind this simple yet powerful modification?
Let’s dive in.
Torque Converter Lockup Basics
Before wiring a torque converter lockup switch, gather all essential tools and materials. Having the right equipment makes the job easier and safer. This step helps avoid delays and mistakes during installation.
Required Tools
- Wire strippers – for removing insulation cleanly
- Crimping tool – to secure connectors on wires
- Multimeter – to test electrical connections and voltage
- Screwdrivers – both flathead and Phillips for mounting parts
- Electrical tape – for insulating wire joints
- Heat shrink tubing – protects and seals wire connections
- Drill with bits – if mounting switch requires holes
- Socket set – to remove panels or covers
Necessary Components
- Torque converter lockup switch – compatible with your vehicle model
- Relay – to control the lockup solenoid power safely
- Fuse and fuse holder – to protect the circuit from overload
- Wiring harness or automotive-grade wire – suitable gauge for current
- Connectors – spade, ring, or butt connectors for secure joins
- Switch mounting bracket – if the switch needs a fixed position
- Installation manual or wiring diagram – specific to your transmission system

Credit: nc4x4.com
Essential Tools And Materials
Finding the torque converter lockup switch is the first step in wiring it correctly. Knowing its exact location helps avoid mistakes and saves time. This switch controls when the torque converter locks up to improve fuel efficiency and reduce heat.
The lockup switch is usually mounted near the transmission or inside the transmission case. Locating it requires some basic knowledge of the vehicle’s setup and access to certain areas under the hood or beneath the car.
Switch Placement
The torque converter lockup switch is often placed on the transmission housing. It can be a small electrical component attached to the side or top of the transmission. In some vehicles, it is integrated with the transmission control system.
Look for a small connector with wires leading into the transmission. The switch may be near the transmission fluid lines or close to the torque converter itself. A clean and secure spot prevents damage from heat and vibration.
Access Points
Accessing the lockup switch can require opening the hood or working under the vehicle. Check near the transmission bell housing, which connects the engine and transmission. Sometimes the switch is reachable from the engine bay.
In some cases, you may need to remove covers or shields to see the switch clearly. Use a flashlight and take care not to disturb other wiring or components. Proper access helps ensure safe and correct wiring connections.
Locating The Lockup Switch
Before wiring a torque converter lockup switch, proper preparation is crucial. This step helps avoid damage and ensures the system works correctly. Taking time to prepare makes the wiring process smoother and safer.
Preparation involves knowing the right safety steps and handling the vehicle’s electrical system carefully. Following these guidelines protects both you and your vehicle from harm.
Safety Precautions
Always wear safety glasses and gloves to protect yourself. Work in a well-ventilated area with good lighting. Keep tools organized and away from moving parts. Avoid loose clothing that can get caught during work. Double-check you have the correct wiring diagram for your vehicle model. Use insulated tools to reduce the risk of electric shock.
Disconnecting Power
Start by disconnecting the vehicle’s negative battery terminal. This step stops electrical flow and prevents shorts. Use a wrench to loosen the battery clamp carefully. Remove the cable and place it away from the battery. Never touch both battery terminals together or with metal tools. Confirm power is off by testing with a voltage meter before proceeding.
Preparing For Wiring
Wiring the torque converter lockup switch requires careful attention to detail. Proper wiring ensures the switch functions correctly, improving your vehicle’s transmission efficiency. Follow these steps to wire the lockup switch safely and effectively. Clear identification and secure connections are key to avoid electrical issues.
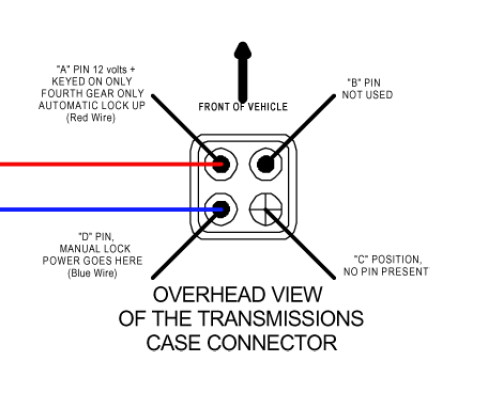
Identifying Wires
Start by locating the wires connected to the torque converter lockup switch. Usually, there are three types of wires: power, ground, and signal. Use a wiring diagram specific to your vehicle model for accuracy. Label each wire to keep track. Check wire colors and verify their function with a multimeter before proceeding.
Connecting Power And Ground
Connect the power wire to a switched 12-volt source. This source should only be active when the ignition is on. Secure the ground wire to a clean, bare metal surface on the vehicle chassis. Use ring terminals and screws for a solid connection. Ensure both connections are tight to prevent voltage drops or shorts.
Routing The Wires
Route the wires away from hot engine parts and moving components. Use wire loom or conduit for protection against heat and abrasion. Secure wires with zip ties or clamps at regular intervals. Avoid sharp edges or pinch points that can damage insulation. Proper routing prevents electrical failures and extends wire life.
Wiring The Lockup Switch
Testing the connection of your torque converter lockup switch is essential. It ensures the wiring is correct and the switch functions properly. Careful testing helps avoid transmission problems and improves vehicle performance. Follow these steps to verify the connection works as expected.
Initial Power-up
Turn on the ignition without starting the engine. This action powers the electrical system and the lockup switch. Check for any immediate signs of power, such as dashboard lights or switch indicators. Use a multimeter to measure voltage at the switch terminals. Confirm the switch receives power and ground to work correctly.
Verifying Lockup Activation
Start the engine and let it reach operating temperature. Shift the transmission to drive and increase engine speed. Watch for the lockup switch to engage, which usually happens around 35-45 mph. Listen for a slight change in engine sound or feel the difference in acceleration. Use a scan tool if available to monitor lockup solenoid activation signals.
Troubleshooting Common Issues
If the lockup switch does not activate, check wiring connections again. Look for loose wires, damaged insulation, or corrosion at connectors. Test the solenoid coil resistance with a multimeter. Replace faulty components if readings are outside the recommended range. Clear any error codes in the transmission control module and retest the system.
Credit: www.corvetteforum.com
Testing The Connection
Maintaining the lockup system of your torque converter is essential for smooth vehicle performance. Regular checks help prevent costly repairs and ensure efficient operation. Simple steps keep the system reliable and extend its lifespan.
Checking Fluid Levels
Start by checking the transmission fluid level regularly. Low fluid can cause the lockup system to fail. Use the dipstick to measure fluid when the engine is warm. The fluid should be clear and bright red. Dark or burnt fluid means it needs changing. Proper fluid keeps the torque converter and lockup switch working well.
Inspecting Wiring And Connections
Inspect all wiring connected to the lockup switch carefully. Look for loose or corroded connections. Damaged wires can interrupt the electrical signal to the solenoid. Clean any dirt or corrosion from connectors. Secure all wires to prevent movement that causes wear. Good wiring ensures the lockup switch activates correctly.
Maintaining The Lockup System
Fixing lockup problems in a torque converter requires careful diagnosis. The lockup switch controls the solenoid that engages the torque converter clutch. Faulty wiring or components can cause slipping or failure to lock. Start by checking the wiring and solenoid function. If the solenoid is faulty, replacing it can restore proper lockup operation. Internal damage inside the torque converter can also cause lockup issues and may need more extensive repair.
Replacing The Solenoid
The solenoid controls the lockup clutch by directing transmission fluid. A bad solenoid can cause the clutch to slip or not engage. To replace it, first disconnect the battery. Locate the solenoid on the transmission and unplug the wiring harness. Remove the mounting bolts and take out the old solenoid. Install the new solenoid, secure it with bolts, and reconnect the wiring. Reconnect the battery and test the lockup function. This simple fix often solves lockup problems.
Addressing Internal Damage
Internal damage to the torque converter clutch or seals can prevent lockup. Signs include slipping, shuddering, or overheating. Repair usually requires removing the transmission. The torque converter must be inspected for worn or broken parts. Sometimes, the entire torque converter needs replacement. Inspect the clutch plates and seals carefully. Fixing internal damage restores smooth lockup and improves transmission life. Professional help is recommended for these repairs.

Credit: monstertransmission.com
Frequently Asked Questions
How Does A Torque Converter Lockup Switch Work?
A torque converter lockup switch activates a solenoid that redirects fluid to engage the clutch. This locks the converter, improving efficiency and reducing slippage at cruising speeds.
How To Wire A 12v Toggle Switch?
To wire a 12V toggle switch, connect the power source to one terminal. Attach the load to the other terminal. Connect the switch’s ground terminal to the negative side of the battery or chassis. Ensure secure, insulated connections to prevent shorts and test the switch operation.
At What Rpm Does A Torque Converter Lockup?
A torque converter typically locks up between 1,500 and 2,500 RPM to improve fuel efficiency and reduce slippage.
How To Fix A Locked Up Torque Converter?
Fix a locked-up torque converter by first checking and replacing dirty fluid and filter. Inspect and replace faulty solenoids or wiring. Reset the transmission control module. If internal clutch damage exists, remove and replace the torque converter.
Conclusion
Wiring a torque converter lockup switch improves transmission efficiency. Follow each step carefully for safety and success. Double-check all connections before testing the system. Proper wiring helps reduce fuel consumption and heat. Take time to understand your vehicle’s wiring diagram.
Troubleshoot any issues promptly to avoid damage. With patience, this task becomes manageable for most car owners. Stay organized and keep tools ready throughout the process. This guide makes wiring simpler and more reliable for you.