How to Inspect Control Arm Bushings: Easy Steps for Safe Driving
If you want to keep your car running smoothly and avoid costly repairs, knowing how to inspect your control arm bushings is a smart move. These small but crucial parts help connect your vehicle’s suspension to the frame, absorbing shocks and ensuring a comfortable ride.
When bushings wear out or get damaged, you might notice strange noises, poor handling, or uneven tire wear. But how can you tell if your control arm bushings need attention? In this guide, you’ll learn simple, step-by-step methods to check for wear and tear.
By the end, you’ll feel confident spotting the signs early and deciding when it’s time for a replacement—saving you time, money, and headaches down the road. Let’s dive in and get your car’s suspension back in top shape!
Visual Inspection
Visual inspection is the first step to check control arm bushings. It helps find damage early and prevents bigger car problems. Use good lighting and clean the area to see clearly. Look carefully around the bushings for any signs of wear or damage. This simple check can save time and money on repairs.
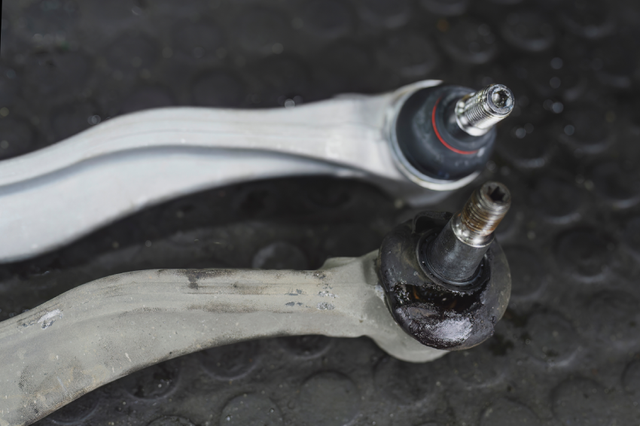
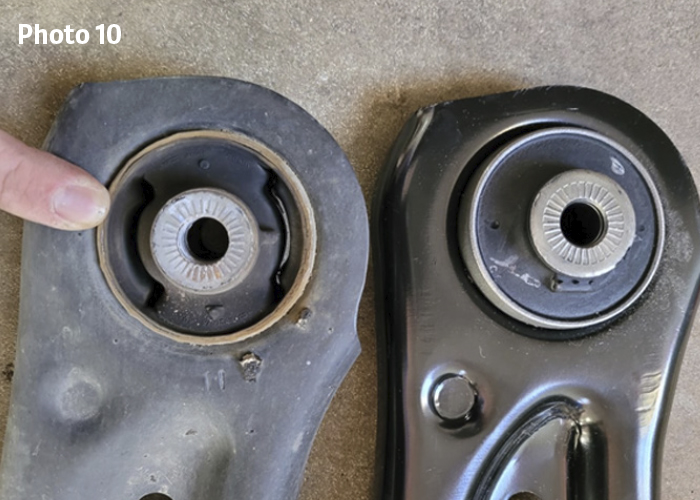
Check For Cracks And Tears
Examine the rubber parts closely. Cracks or tears show the bushing is breaking down. Small cracks can grow and cause noise or poor handling. Use a flashlight to see hidden spots. If you spot any damage, note the size and location.
Assess Rubber Condition
Rubber should be flexible and firm. Hard or brittle rubber loses its ability to absorb shocks. Look for dry or missing chunks. If the rubber feels soft or squishy, it may be worn out. Healthy bushings improve ride comfort and steering control.
Look For Metal Sleeve Damage
Check the metal sleeve inside the bushing. It should be smooth and free of rust. Rust or dents mean the bushing may not hold parts tightly. Bent or broken sleeves can cause vibrations or uneven tire wear. Clean the metal surface for a better view.
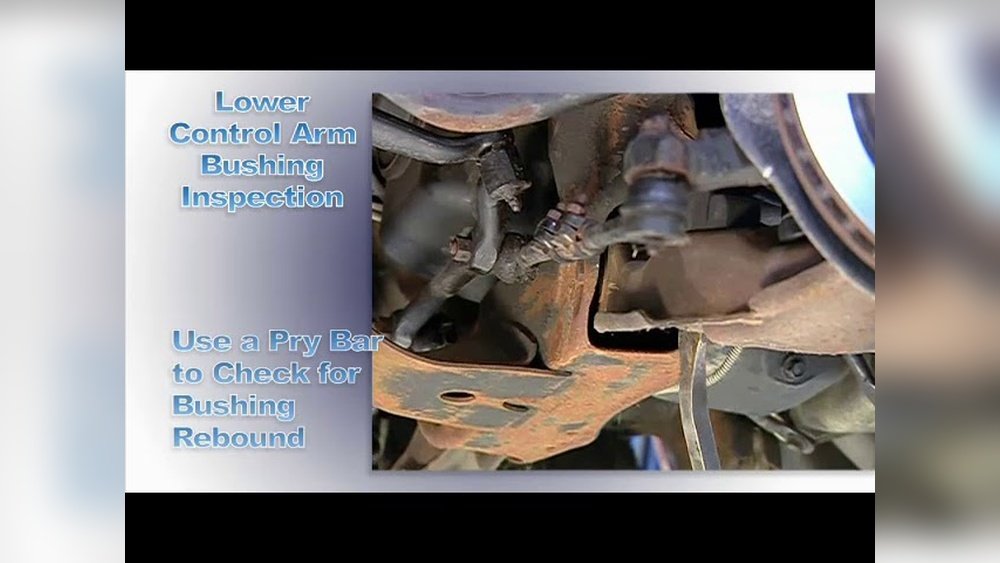
Pry Bar Test
The Pry Bar Test is a simple way to check control arm bushings for wear. It helps find looseness or damage that may affect vehicle handling. This test uses a pry bar to apply gentle force to the bushing area. The goal is to spot any unusual movement or play that shows bushing wear.
Positioning The Pry Bar
Place the pry bar carefully between the control arm and the vehicle frame. Ensure the bar rests against the bushing area. Position it so you can apply force without slipping. A steady hand helps keep the bar in place during the test.
Applying Gentle Force
Push the pry bar slowly and gently. Avoid using too much force that can damage parts. The movement should be small and controlled. The goal is to test the bushing’s flexibility and strength.
Detecting Excessive Movement
Watch the control arm and bushing closely as you apply force. Any large or sudden movement means the bushing might be worn out. Slight movement is normal, but excessive play is a warning sign. Replace bushings if they allow too much movement.
Signs Of Wear
Control arm bushings connect the vehicle’s suspension to the frame. They absorb shocks and reduce vibrations. Over time, these bushings wear out due to constant movement and stress. Recognizing signs of wear helps prevent bigger problems. It keeps your vehicle safe and improves ride quality.
Unusual Vehicle Noises
Worn control arm bushings often cause strange noises. You might hear clunks or knocking sounds when driving over bumps. These noises come from metal parts rubbing against each other. Pay attention to sounds during turns or rough roads. Early detection through noise can save repair costs.
Steering And Alignment Issues
Bad bushings affect steering control and wheel alignment. Your steering may feel loose or less responsive. The vehicle could pull to one side while driving. Tires might wear unevenly, showing signs of poor alignment. These issues make driving unsafe and uncomfortable.
Vibrations And Handling Problems
Vibrations in the steering wheel or chassis can indicate worn bushings. You may notice a rougher ride or shaking during acceleration. Handling becomes less stable, especially on turns or rough surfaces. Such problems reduce driver confidence and vehicle control.
Credit: www.professionalautorepair.com
Tools Needed
Inspecting control arm bushings requires the right tools for a thorough check. Using proper tools helps spot wear and damage easily. It also ensures safety during the inspection process. Gather these essential tools before you start your inspection.
Basic Hand Tools
Start with a set of basic hand tools like wrenches and sockets. These help remove bolts and nuts holding the control arm. A ratchet and a breaker bar make the job easier. Screwdrivers can assist in prying or adjusting parts gently. Keep a hammer nearby for light tapping if needed.
Jack And Jack Stands
Use a reliable jack to lift your vehicle safely. Jack stands hold the vehicle steady while you work underneath. Never rely on the jack alone for support. Place the stands under strong frame points to avoid accidents. This setup gives you space to inspect the control arm bushings closely.
Flashlight Or Inspection Lamp
A bright flashlight helps reveal cracks and wear on bushings. Inspection lamps with adjustable arms can shine light from different angles. Good lighting is crucial for spotting hidden damage. Choose a tool that fits your workspace and provides clear visibility.
Removing The Control Arm
Removing the control arm is the first major step in inspecting control arm bushings. This process requires careful handling and proper tools. Follow clear steps to avoid damage and ensure safety. The control arm connects important parts of your vehicle’s suspension system. Removing it lets you access the bushings for a thorough inspection or replacement.
Safety Precautions
Wear safety gloves and goggles before starting. Use jack stands to support the vehicle securely. Never rely on a jack alone to hold the car up. Work on a flat, stable surface to prevent slipping. Disconnect the battery to avoid accidental electrical issues. Keep tools organized and within reach during the task.
Loosening Bolts
Locate all bolts attaching the control arm to the frame and suspension. Spray penetrating oil on rusty or tight bolts to ease loosening. Use the correct size socket or wrench to avoid rounding bolts. Loosen bolts gradually to reduce strain on parts. Keep all bolts and nuts in a safe place for reassembly.
Detaching The Control Arm
After bolts are loose, carefully pull the control arm away from its mounting points. You may need to gently tap the arm with a rubber mallet to free it. Avoid using excessive force that could damage other suspension parts. Support the control arm as you remove it to prevent it from falling. Place the control arm on a clean surface for inspection.

Credit: www.youtube.com
Bushing Replacement Methods
Replacing control arm bushings requires the right method to ensure durability and safety. Different techniques suit various tools and skill levels. Choosing the proper method helps avoid damage to the control arm or new bushings. Here are common bushing replacement methods used in workshops and by DIY mechanics.
Using A Hydraulic Press
A hydraulic press is the most reliable tool for removing and installing bushings. It applies steady force to push out the old bushing without harming the control arm. Position the arm securely in the press frame. Align the press plate with the bushing. Slowly apply pressure until the bushing slides out. Use the same process to press the new bushing in place. This method offers precision and prevents damage.
Without A Press Technique
Replacing bushings without a press is possible using hand tools and patience. First, remove the control arm from the vehicle. Use a hammer and a socket or bushing removal tool to tap the old bushing out. Work carefully to avoid bending the arm. Clean the bushing seat thoroughly. This method is slower and less precise but works in the absence of a press.
Installing New Bushings
Before installing new bushings, apply a small amount of lubricant or bushing grease. This makes insertion easier and prevents squeaking. Align the new bushing with the control arm’s hole. Use a press or carefully tap the bushing in with a hammer and socket. Ensure the bushing sits flush and evenly inside the arm. Proper installation extends the life of the bushing and improves vehicle handling.
Post-inspection Steps
After inspecting the control arm bushings, several steps help ensure your vehicle runs smoothly. These post-inspection actions confirm the condition of the bushings and address any issues found. Following these steps can improve safety and performance on the road.
Test Drive For Performance
Take your vehicle for a short drive to check for handling problems. Notice any unusual noises, vibrations, or pulling to one side. Pay attention to steering response and ride comfort. These signs can indicate worn or damaged bushings that need replacement.
Check Alignment
Misaligned wheels often result from faulty control arm bushings. Have a professional check the wheel alignment after inspection. Proper alignment prevents uneven tire wear and improves vehicle control. Correcting alignment issues extends the life of your tires and suspension parts.
Regular Maintenance Tips
Inspect control arm bushings regularly as part of your vehicle’s routine maintenance. Keep suspension components clean and free from dirt and debris. Replace bushings at the first sign of cracking or excessive wear. Timely maintenance prevents costly repairs and ensures safe driving.
Credit: www.brakeandfrontend.com
Frequently Asked Questions
How To Check If Control Arm Bushings Are Bad?
Check control arm bushings by inspecting for cracks, excessive movement, or noise during wheel turns. Use a lever to test for play.
How To Visually Inspect A Control Arm?
Shine a lamp on the control arm to spot cracks or wear. Use a lever to test for movement. Movement over one centimeter indicates worn bushings needing replacement.
How Does A Technician Check For Control Arm Bushing Wear?
A technician inspects control arm bushings by visually checking for cracks or wear. They apply side pressure to detect excessive movement or looseness, indicating bushing wear. If the bushings shift or don’t return to center, replacement is necessary.
How To Press Out Bushings Without A Press?
Use a large socket and a hammer to drive the bushing out carefully. Lubricate and support the control arm for safety.
Conclusion
Regularly inspecting control arm bushings keeps your vehicle safe and smooth. Watch for cracks, tears, or unusual movement. Use simple tools like a flashlight and a lever for checks. Early detection helps avoid costly repairs later. Stay attentive to any strange noises or handling issues while driving.
Routine checks improve your car’s lifespan and performance. Remember, safe rides start with good maintenance habits. Keep your control arm bushings in good shape for worry-free driving.